Quick Start Guide
This guide will show you how to deploy an ERC-721 contract using Circle’s NFT template. Yo’ll learn to use both the Developer Services Console and API paths. The console is ideal for beginners to explore and understand contract functions.Evaluate Templates
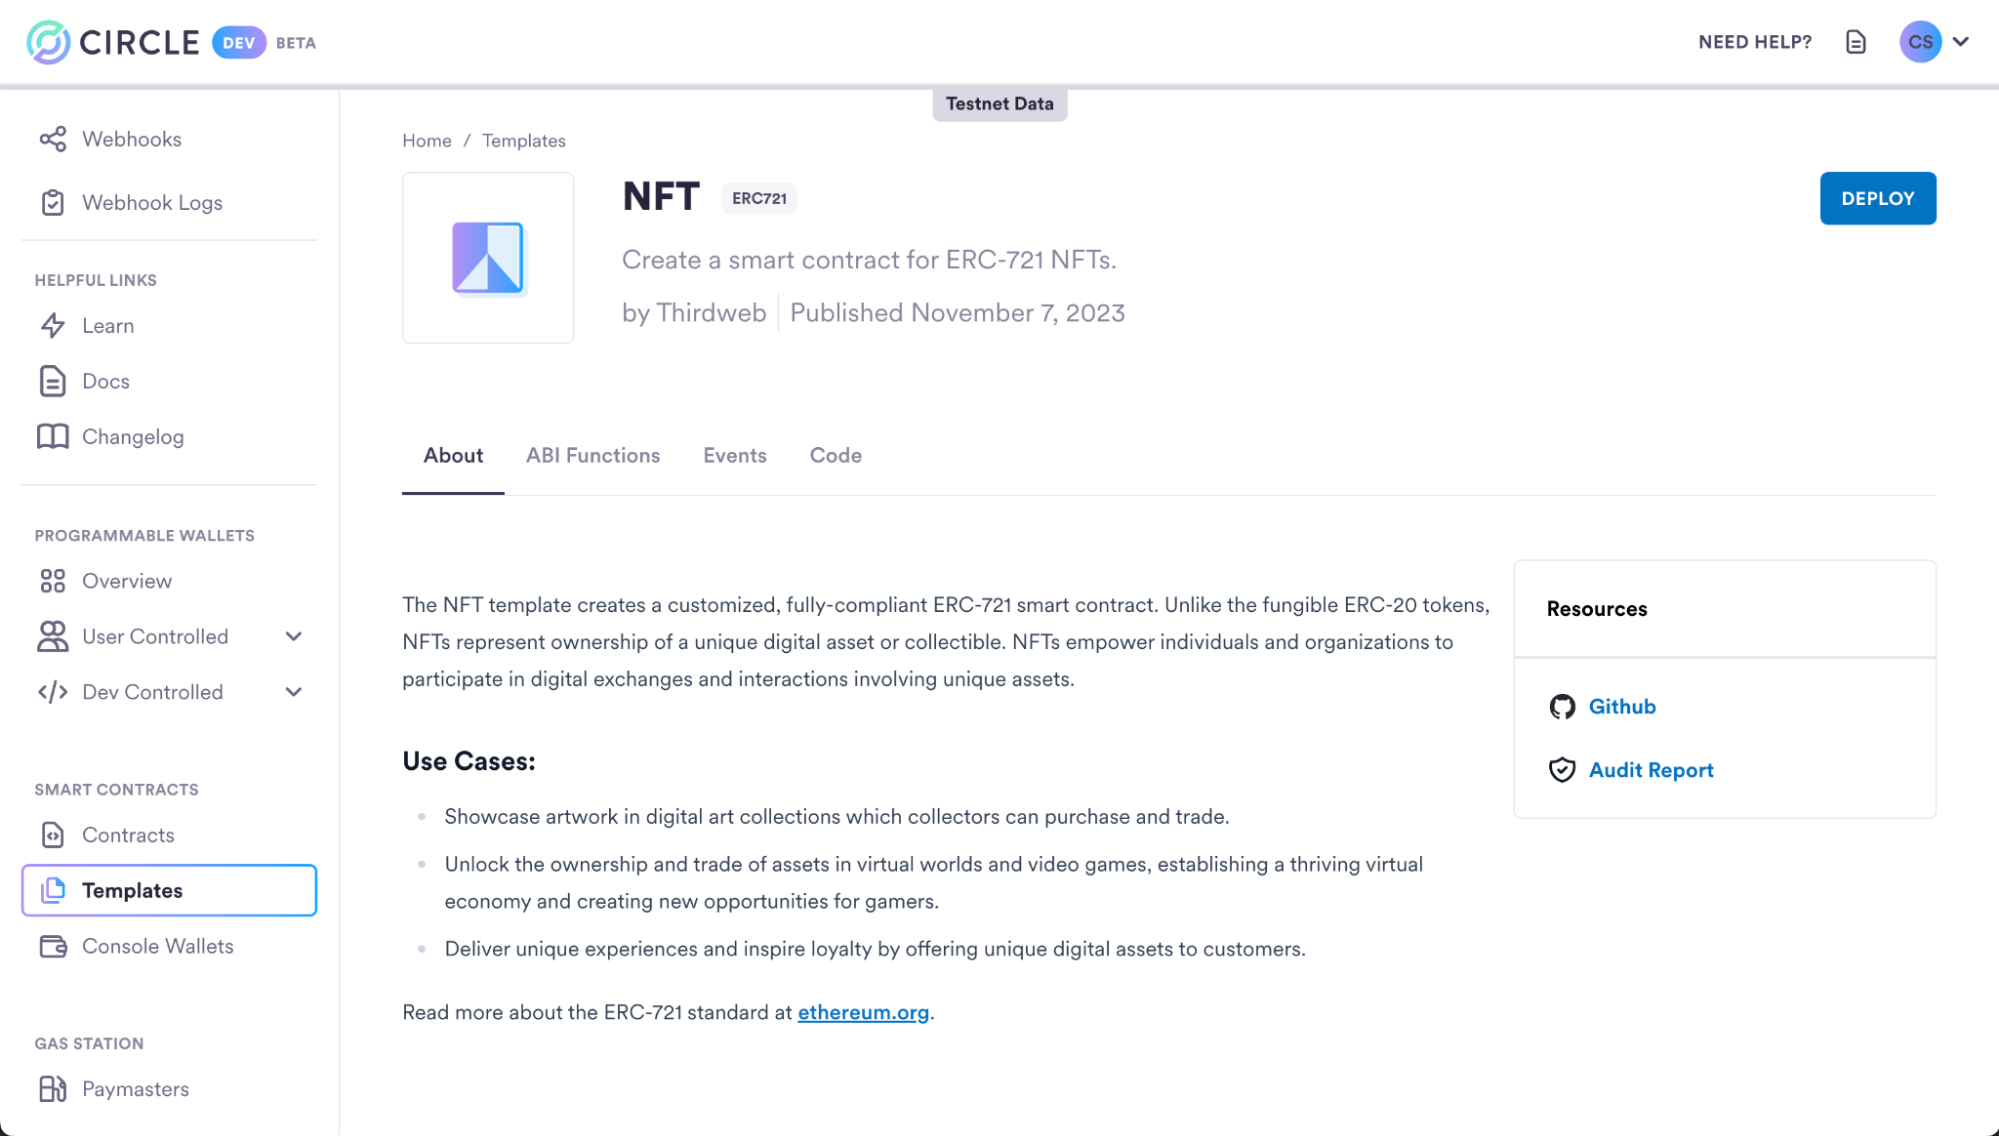
To learn more about the NFT template or any other template, go to the Developer Services Console or the Templates Glossary guide.- Developer Services Console: Viewing templates from the console provides a simple way to understand the contracts offered, what they are, the primary use cases each supports, the contracts’ ABI functions, events, and code.
- Template Glossary: Outlines the templates offered, a summary of each one, and the configuration options for deployment.
Select Your Preferred Approach
- Console Path: Use the Developer Services Console and a console wallet to deploy a smart contract template and mint an NFT. This UI option is the preferred method for those new to using Smart Contracts. It is faster and has much fewer prerequisite steps.
- API Path: Use APIs to deploy a smart contract template and mint an NFT. This option is more technical and requires creating an API key and a Developer-Controlled wallet.
Console UI Path
Prerequisites
- Create a Developer Account.
Console Wallets
Console Wallets are Smart Contract Accounts specifically designed to be used within the Console and cannot be utilized with the APIs. Console Wallets leverage Gas Station, eliminating the need to maintain gas in the wallet to cover transaction fees. To learn more about the Gas Station, please refer to the Gas Station overview. If you do not already have a Console Wallet, you will be prompted to create one during the deployment of your first smart contract.1. Deploy the Smart Contract
In the console:- Navigate to the Templates tab via the left navigation.
- Select NFT ERC-721.
-
Fill in the contract template deployment parameters:
- Name: The off-chain name of the contract. This will only be represented on Circle’s systems, such as the APIs and Developer Services Console. In this case, you can use “My First NFT Contract” or any other name you prefer.
- Contract Name: The on-chain name for the contract. In this case, you can use “My First NFT Contract” or any other name you prefer.
-
Default Admin: The address of the default admin. This address can
execute permissions functions on the contract. This should be an address
you control or the address of a user if deploying on their behalf. In this
case, use the console wallet’s address from step one.
- NOTE: The following roles will be given to the defaultAdmin:
DEFAULT_ADMIN_ROLE,MINTER_ROLE,TRANSFER_ROLE. ThedefaultAdminwill also be set as the contract’s owner. All of these roles can be updated by the defaultAdmin later.
- NOTE: The following roles will be given to the defaultAdmin:
- Primary Sale Recipient: The recipient’s address for first-time sales. All first-time sale proceeds will go to this address. In this case, use the console wallet’s address from step one.
- Royalty Recipient: The recipient address for all royalties. Any proceeds from secondary sales will go to this address. In this case, use the console wallet’s address from step one.
- Royalty Percent: The percentage of secondary sales that go to the royalty recipient. There should be a value between 0 and 100. In this case, use “0”.
- Network: The network to deploy onto. In this case, select “Polygon Amoy”.
- Select Wallet: The wallet to deploy the smart contract from. In this case, select “Console Wallet 1”
- Deployment Speed: A fee level setting (FAST, AVERAGE, SLOW). This affects how quickly the network will process your deployment transaction. In this case, you will use “AVERAGE”.
- Select Deploy.
Console Wallet CreationAfter selecting a network, you will prompted to create a Console Wallet for
deployment. This wallet will automatically be created on all available
networks. On testnet, this will also automatically create a Policy for Gas
Station. For more information on sponsoring transactions, see
Gas Station Policy Management .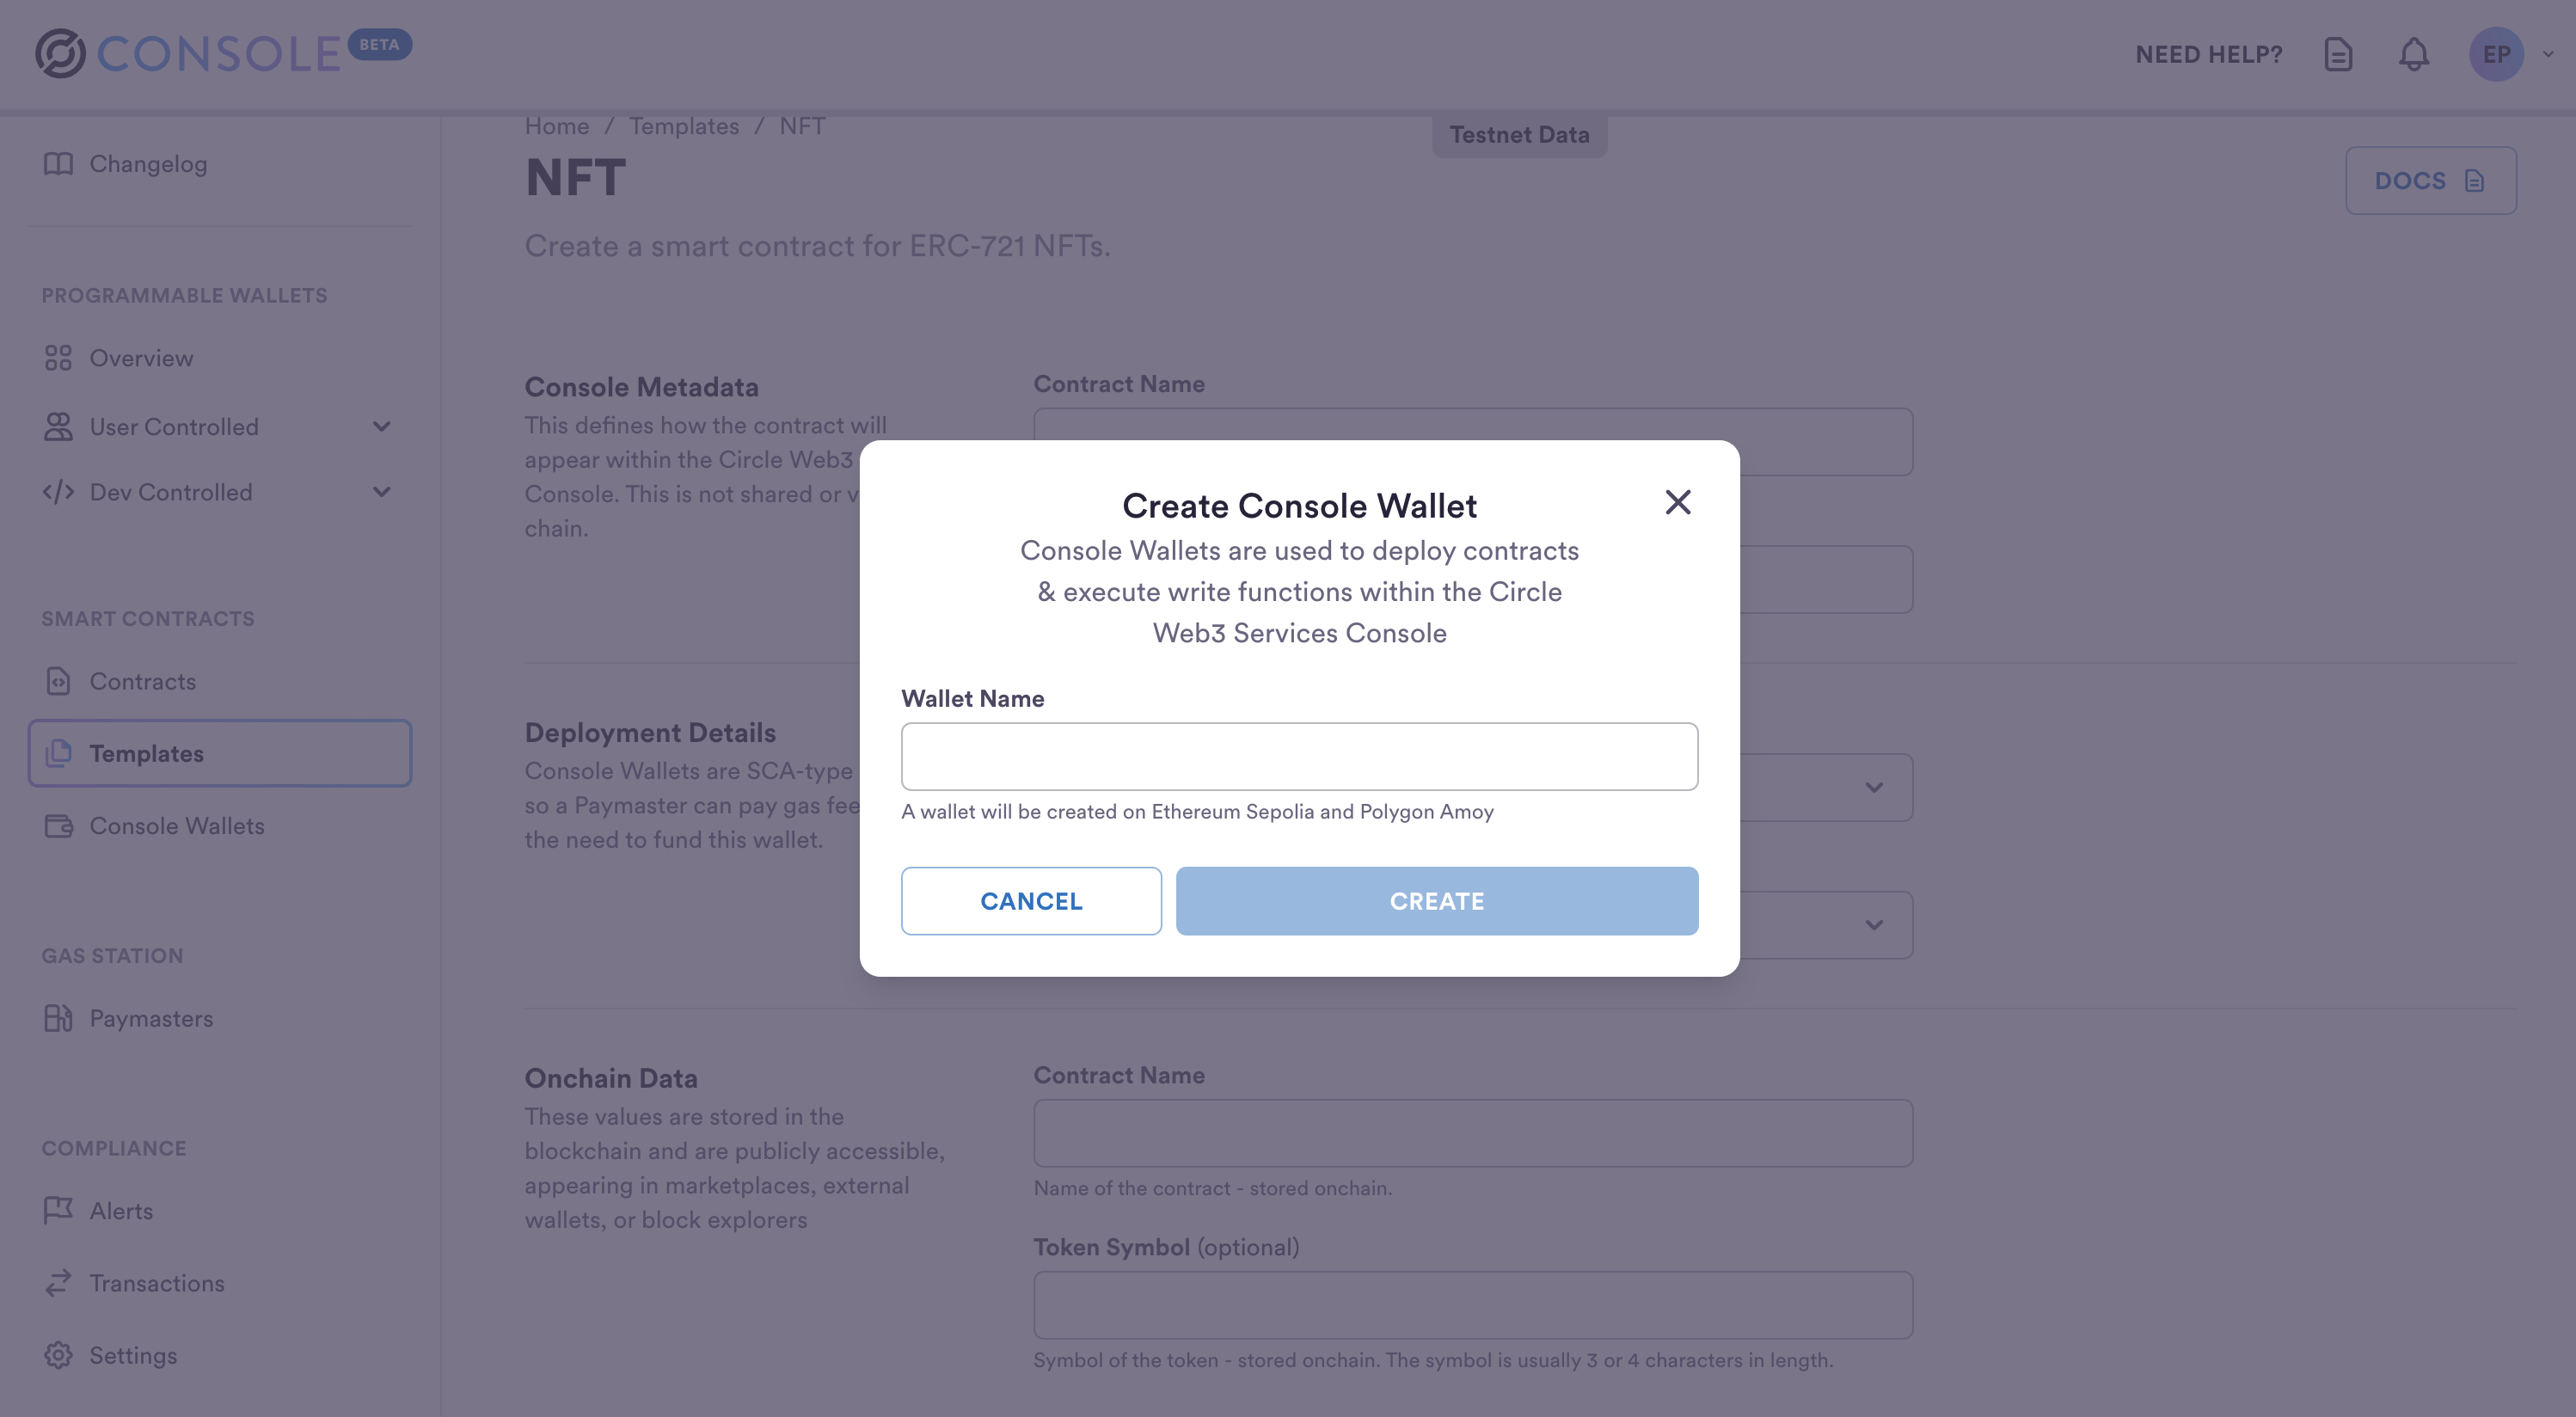
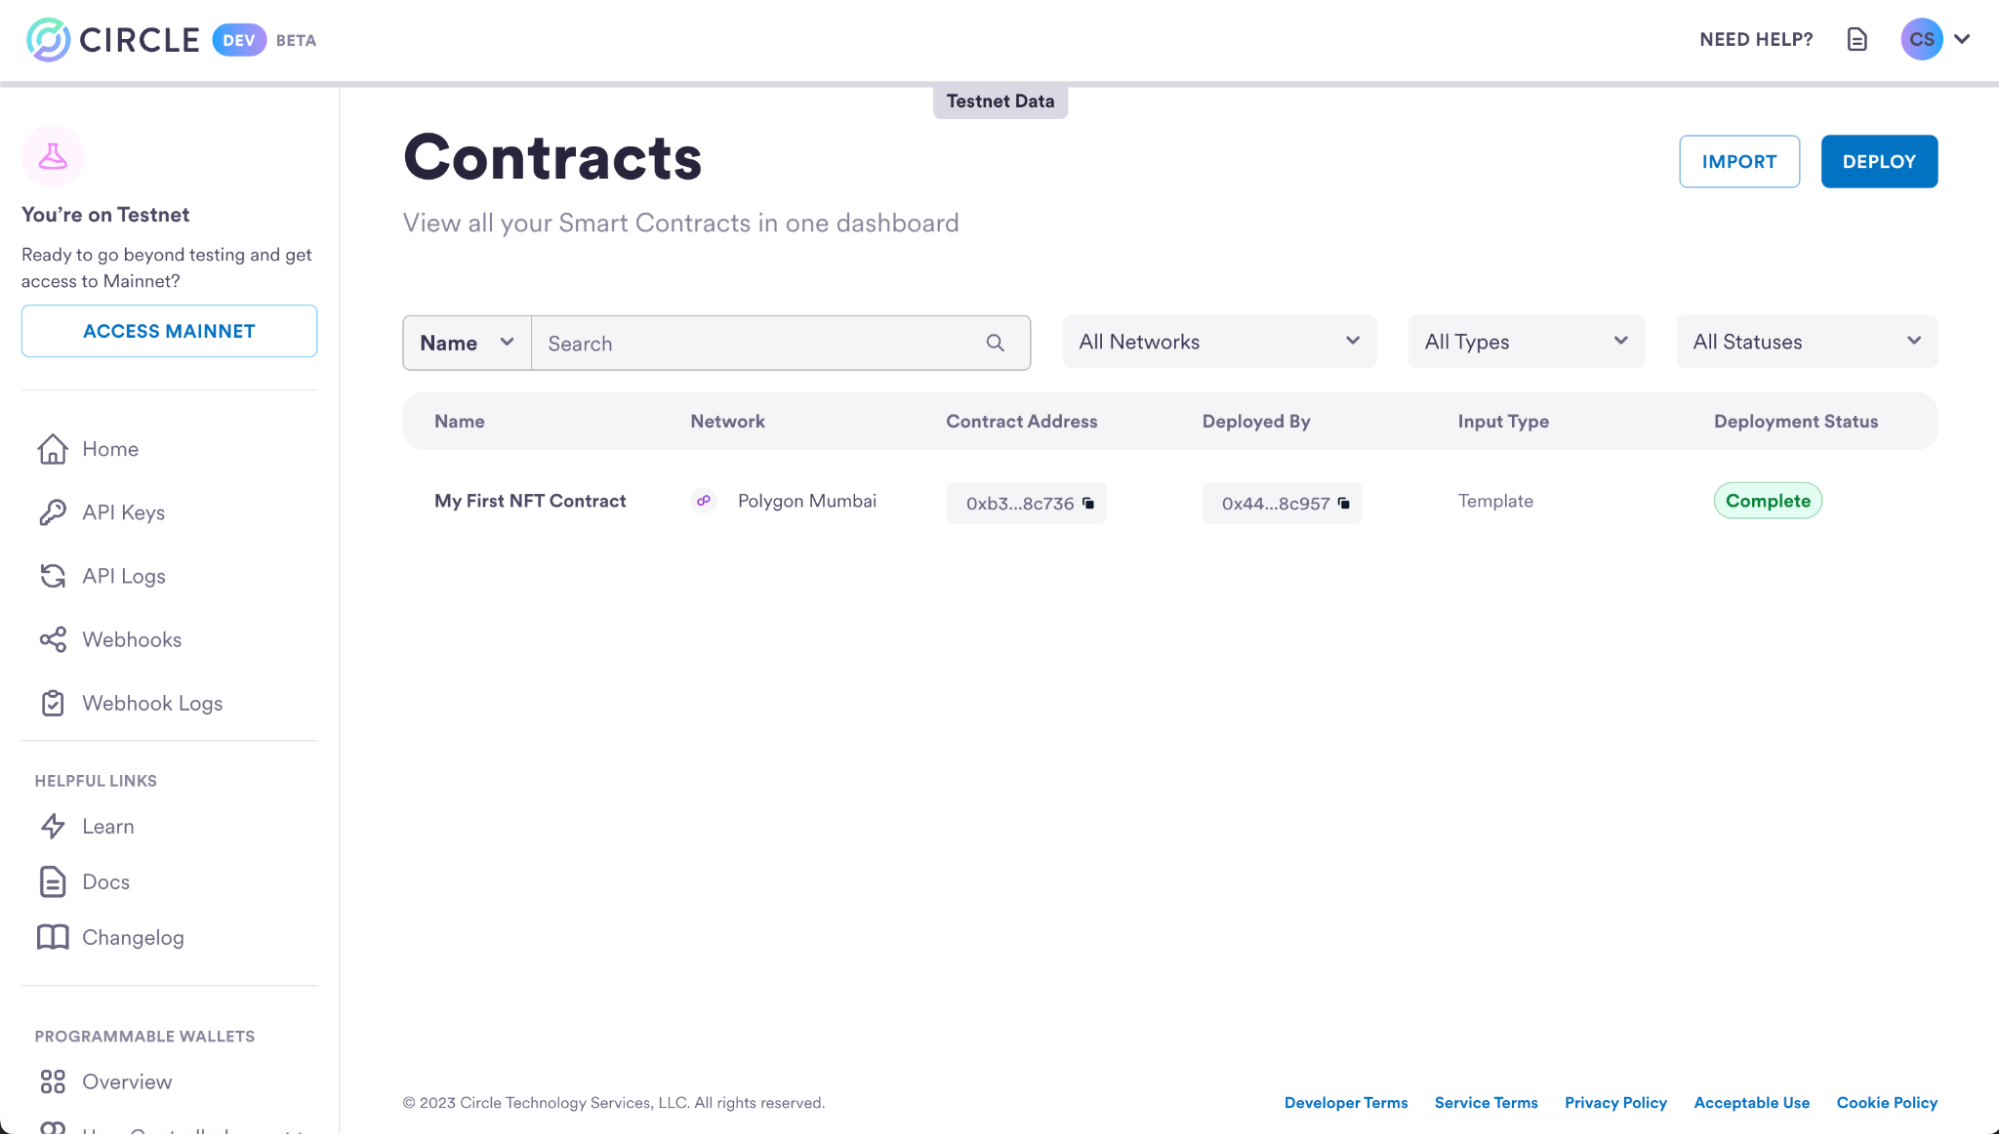
Once deployed, you will be placed back on the Contracts dashboard. Here, you can check the deployment status of the contract. When you land on the page, expect the deployment status to be Pending. Give it several seconds, and then refresh the page. At this point, the deployment status should be set to Complete.
2. Mint an NFT
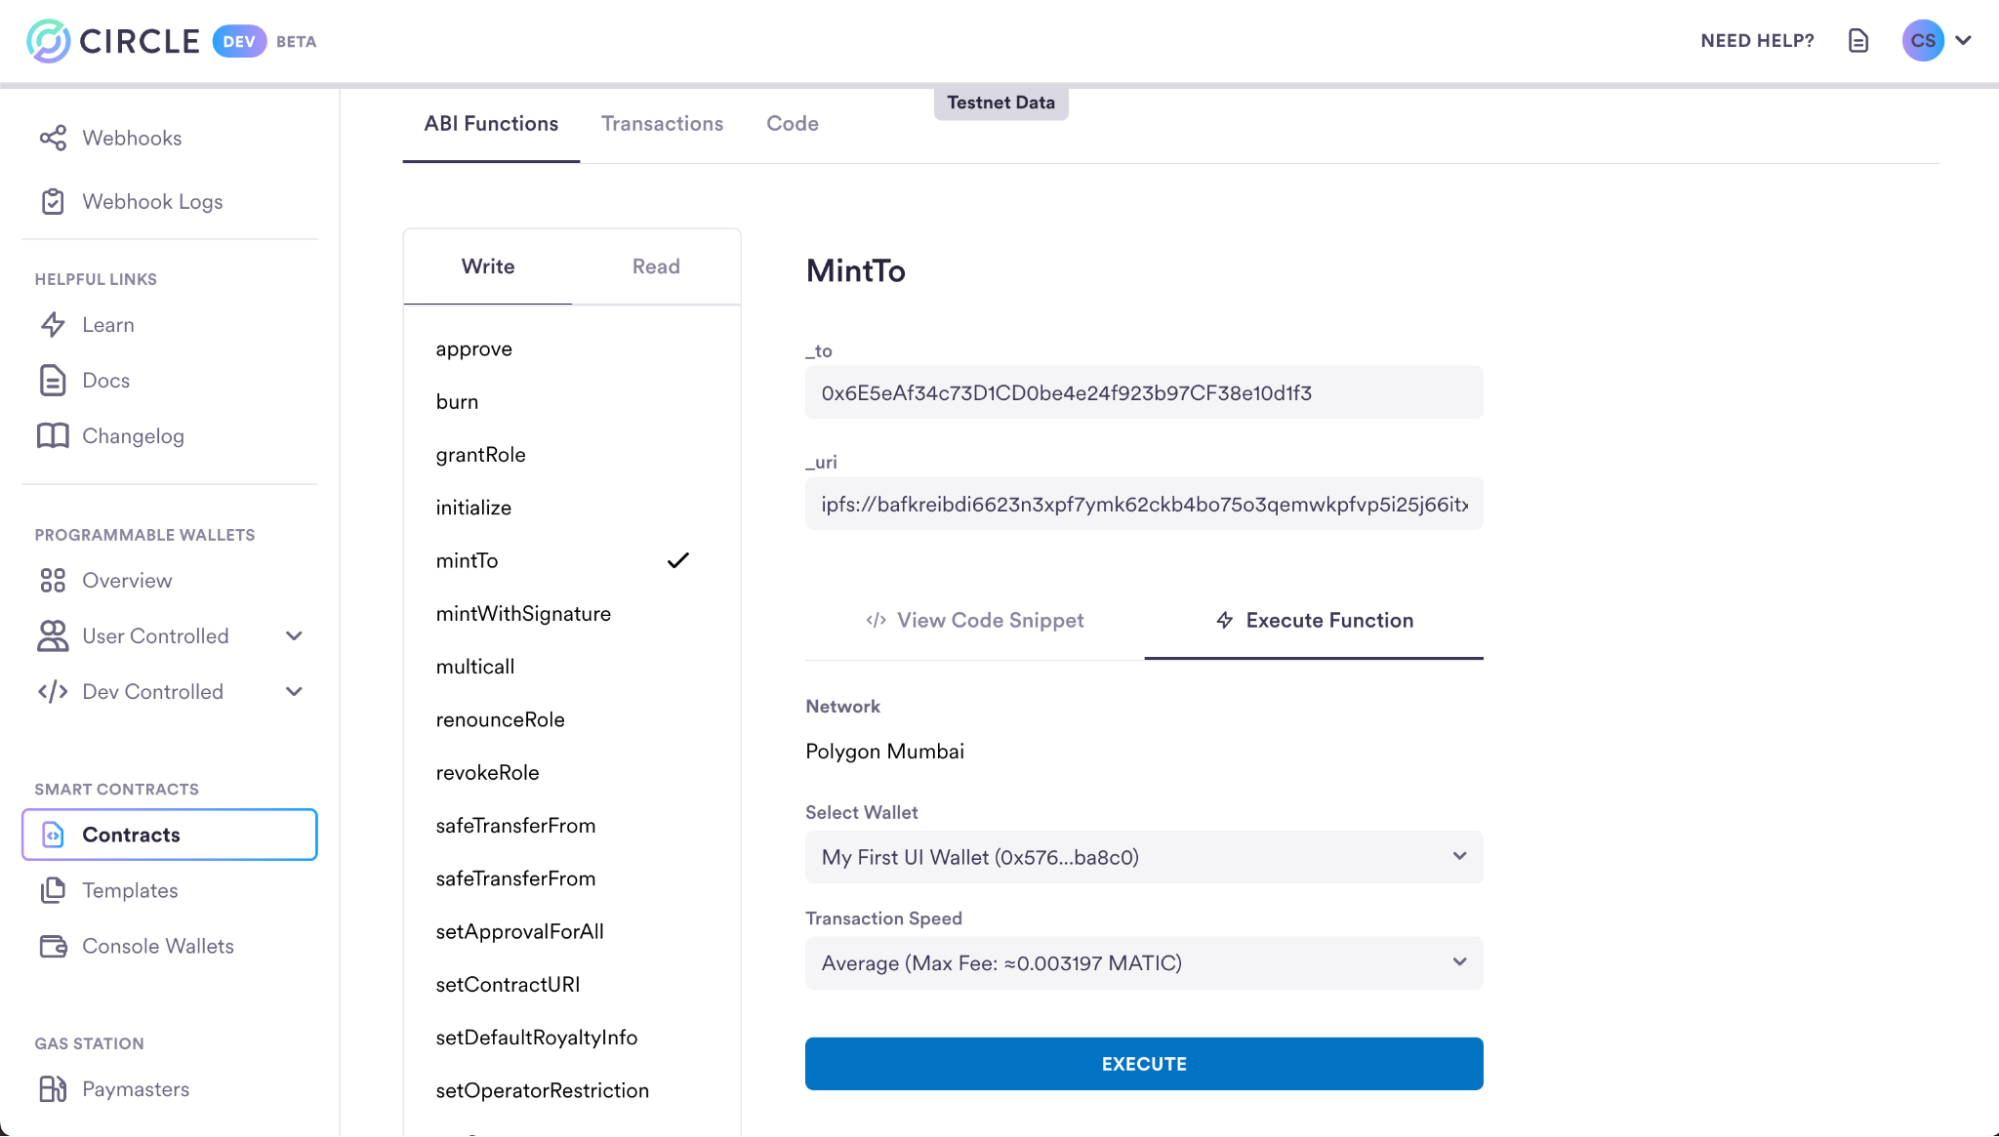
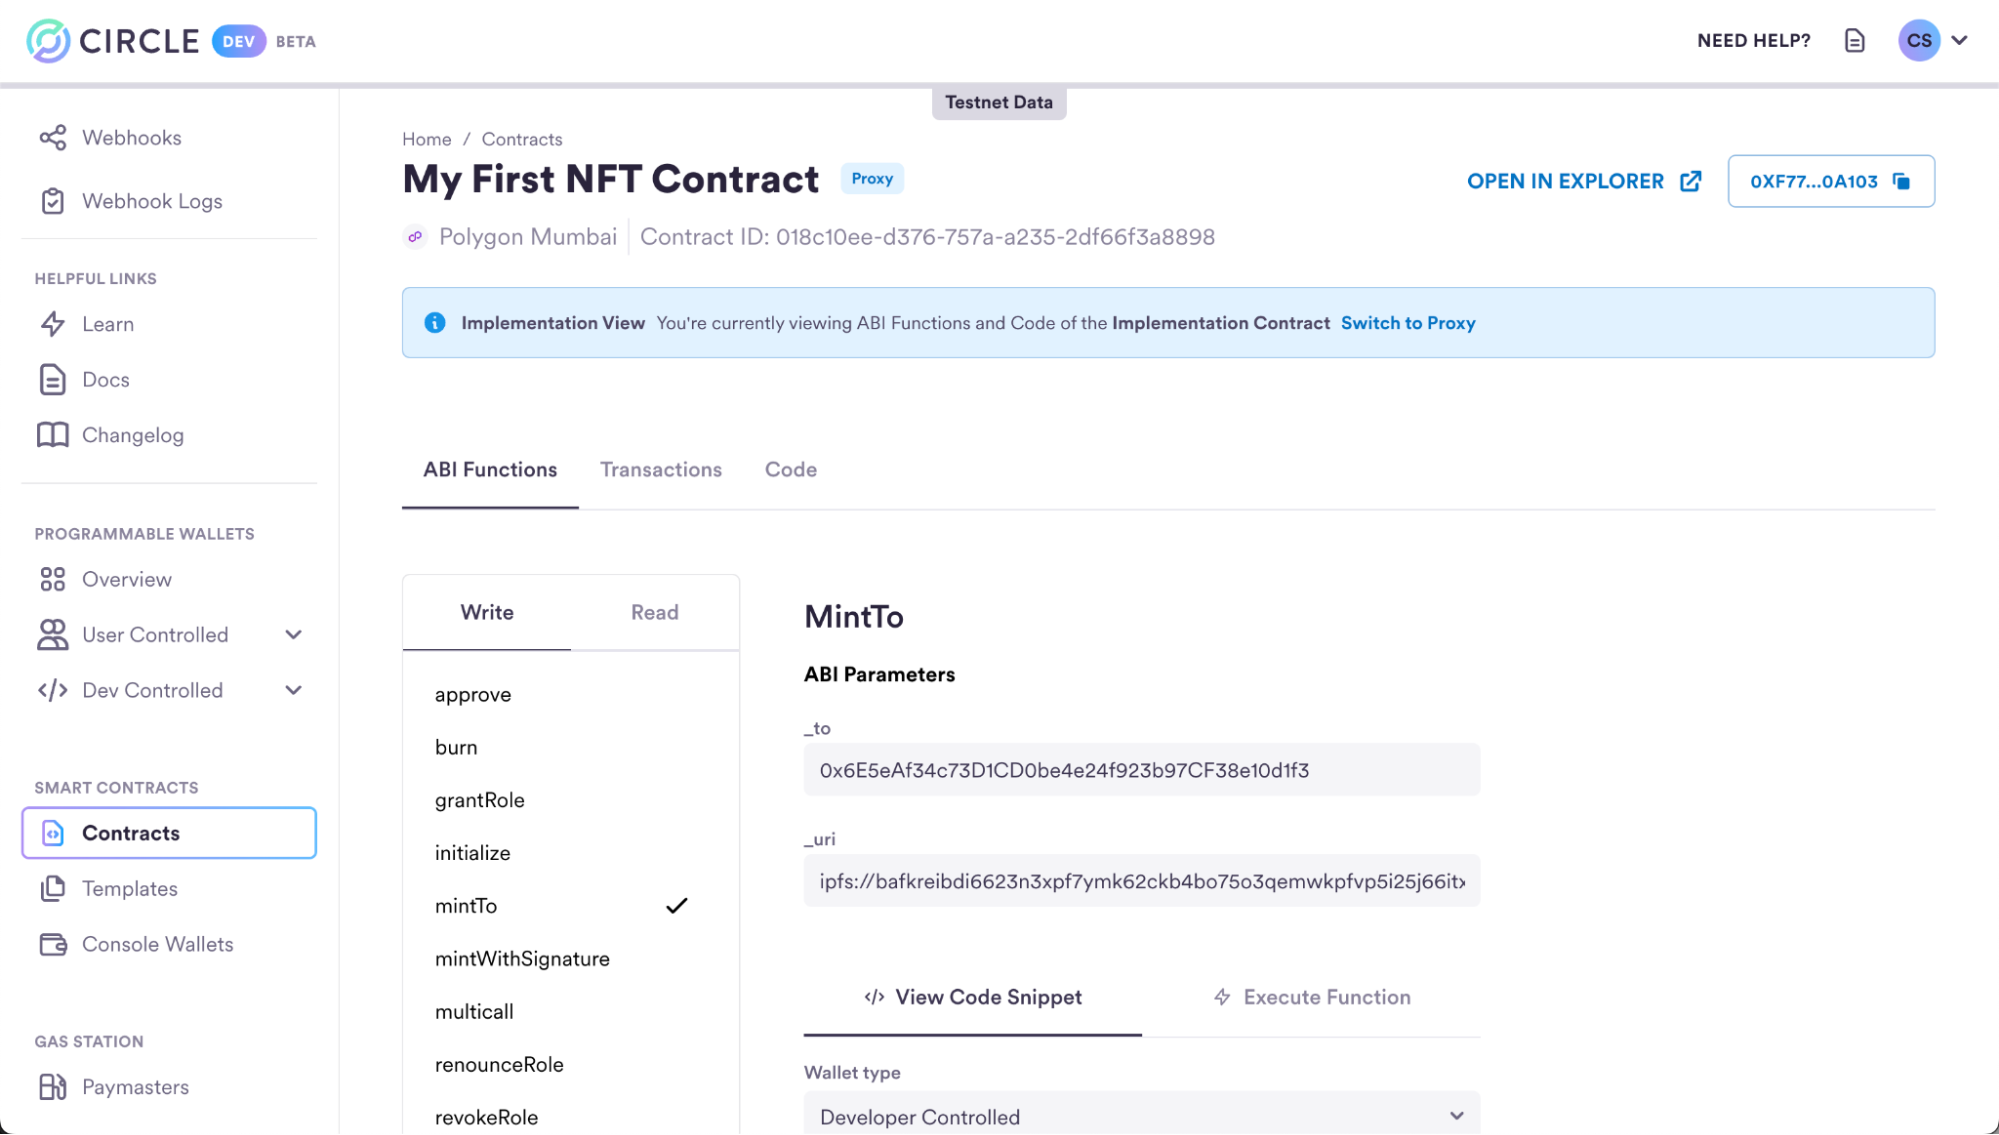
Let’s dive into the Console UI to explore the full range of capabilities it offers and mint an NFT. With the Console, you can seamlessly explore the NFT contract you deployed. Gain insights into its ABI functions, inspect their inputs, and easily execute functions. In this example, we will directly execute the mintTo function from the console - which mints an NFT to a user without a sale. In the console:- Navigate to the Contracts tab.
- Select the My First NFT Contract within the console.
- Select ABI Functions sub tab. This should be selected by default.
- Select Write.
- Select mintTo.
-
On the mintTo ABI function, provide the following parameters:
- _to: The wallet address to which the NFT will be minted. In this case, use the wallet address of the wallet you deployed the contract from. Ultimately, this can be any wallet on-chain.
- _uri: A distinct Uniform Resource Identifier (URI) for a given asset. This can be a IPFS CID, a CDN URI or any other resource identifier.
- Select Execute Function and ensure Console Wallet 1 is selected.
- Select Execute.
Inbound TransactionIn the transaction history view, you will also notice an inbound transfer
indicating that the NFT has been minted to the Console Wallet.
- Learn how to mint NFTs via the API.
- Deploy a Token or Multi-Token contract.
API Path
Prerequisites
- Create a Developer Account, API key, and set up a Developer-Controlled Wallet. We recommend using our interactive quickstart guide to complete these requirements if you haven’t already.
1. Deploy the Smart Contract
To deploy a smart contract, you must provide a wallet to deploy from. If you don’t have thewalletId, you can use the
GET /wallets
API to acquire the wallet ID. Ensure the wallet custody type is
Developer-Controlled and the blockchain is Polygon Amoy. We recommend the
account type be SCA - removing the need for gas in your wallet for deployment.
Lastly, note down the wallet’s address. This will be used in the subsequent
steps.
Deployment Request Parameters:
- idempotencyKey: A unique value generated by the client that the server uses to recognize subsequent retries of the same request.
- name: The off-chain name of the contract. This will only be represented
on Circle’s System such as the APIs and Developer Services Console. In this
case, you can use
My First NFT Contractor any other name you prefer. - walletId: The ID of the wallet to deploy from.
- templateId: The ID of the chosen template. In this case, you will use
76b83278-50e2-4006-8b63-5b1a2a814533as the ID for the NFT template. ThistemplateIdand other template-specific details are listed in the Templates Glossary. - blockchain: The network to deploy onto. In this case, you will use
MATIC-AMOY. - entitySecretCiphertext: The encrypted ciphertext of your entity secret. It must be re-encrypted for every new request. Go to How to Re-Encrypt the Entity Secret to learn more about generating an entity secret ciphertext.
- feeLevel: A fee level setting (LOW, MEDIUM, HIGH). This affects how
quickly the network will process your deployment transaction. In this case,
you will use
MEDIUM. - templateParameters: A JSON object representing the template deployment parameters and arguments. This object is explained in more detail below.
Template Parameters
Template parameters are the inputs for initializing and deploying the template on-chain. Each template will have its own set of parameters. For the NFT template, the required properties are:- name: The on-chain name for the contract. In this case, you can use
My First NFT Contractor any other name you prefer. - defaultAdmin: The address of the default admin. This address can execute
permissioned functions on the contract. This should be an address you control
or the address of a user if deploying on their behalf. In this case, use the
developer-controlled wallet’s address retrieved from the
GET /walletsAPI above.- NOTE: The following roles will be given to the defaultAdmin:
DEFAULT_ADMIN_ROLE,MINTER_ROLE,TRANSFER_ROLE. ThedefaultAdminwill also be set as the contract’s owner. All of these roles can be updated by the defaultAdmin later.
- NOTE: The following roles will be given to the defaultAdmin:
- primarySaleRecipient: The recipient address for first-time sales. All
first-time sale proceeds will go to this address. In this case, use the
developer-controlled wallet’s address retrieved from the
GET /walletsAPI above. - royaltyRecipient: The recipient address for all royalties. Any proceeds
from secondary sales will go to this address. In this case, use
0. - royaltyPercent: The percentage of secondary sales that go to the royalty
recipient. It should be a value between 0 and 100. In this case, use the
developer-controlled wallet’s address retrieved from the
GET /walletsAPI above.
POST /templates/{id}/deploy
API. You must also pass your entity secret ciphertext in the request body. The
full request is as follows:
JSON
A successful API response indicates that the deployment process has been
initiated but does not guarantee that the deployment will be successful. The
returned
transactionId can be used to check the status of the deployment
transaction using
get a transaction.Response
contractId can be used to perform further management and
interaction with the deployed smart contract, such as minting an NFT.
2. Mint an NFT
Let’s dive into the Developer Services Console to explore its full range of capabilities. With the Console, you can seamlessly explore the NFT contract you deployed. Gain insights into its ABI functions, inspect their inputs, and easily execute functions through an API call by conveniently copying the required code. Alternatively, you can retrieve detailed information about the contract using theGet contract by ID
response, which includes all the available functions and events.
In this example, we will use the code snippet generator to build the contract
execution request for the mintTo function - which mints an NFT to a user
without a sale. This can be done by selecting the contract within the Console,
then in the ABI functions tab, selecting write, and selecting mintTo.
mintTo function, the code to make a
contract execution API request and mint the NFT is automatically generated. Make
sure to select your preferred wallet type and code generated, in this case,
select a Developer Controlled wallet and Shell to create a cURL request example.
mintTo function parameters:
- _to: The wallet address that the NFT will be minted to. In this case, use the wallet address of the wallet you deployed the contract from. Ultimately, this can be any wallet on-chain.
- _uri: A distinct Uniform Resource Identifier (URI) for a given asset. This can be a IPFS CID, a CDN URI or any other resource identifier.
walletId and entitySecretCiphertext to the API request.
walletId must have the MINTER_ROLE on the
contract to mint an NFT. Make sure you use the appropriate walletId.
JSON
Transaction ProcessingA successful API response indicates that the
mintTo transaction has been
initiated but does not guarantee that the deployment will be successful.GET /transactions/{id}
providing the ID of the transaction received in the response above.
Response
_to address that you
previously specified - will now be able to use and interact with the minted NFT.
Congratulations, you have deployed a smart contract and minted an NFT!
Next steps
- Learn how to mint NFTs via the Console.
- Deploy a Token or Multi-Token contract.