- Social logins - Allow your users to log in with their Google, Apple, or Facebook account, via OAuth 2.0.
- Email - Send your users an email containing a one-time password (OTP) for identity verification.
- PIN - Allow your users to create a PIN that must be used to authorize every transaction. Enable biometrics for users to authorize transactions with their fingerprint or through facial recognition.
Authentication method differences
The following table describes the onboarding UX, signing UX, and key management for each authentication method.- Onboarding UX - User experience upon signing up for your application.
- Signing UX - User experience for previewing and confirming signature or transaction details.
- Key Management - How a user’s private key is managed.
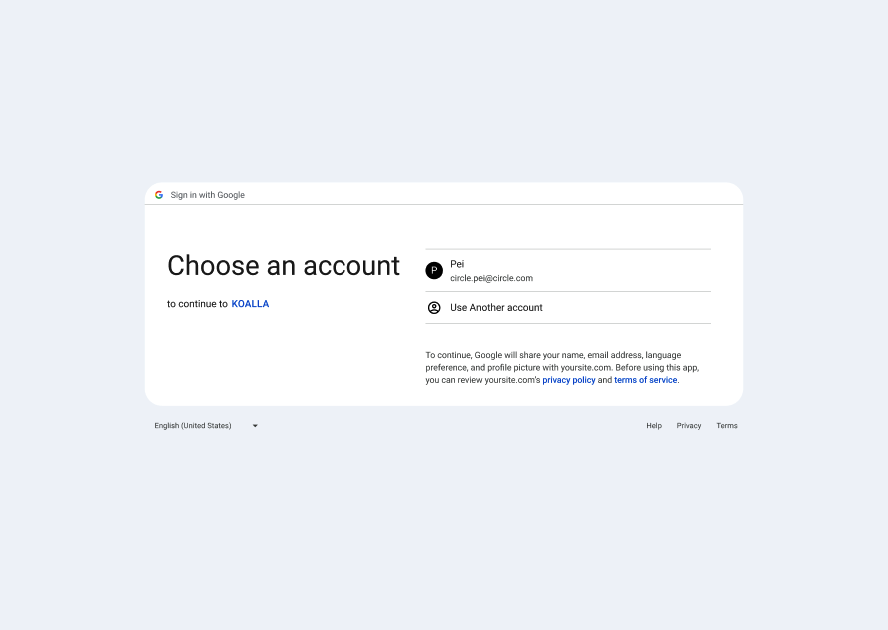
Social logins
The social logins authentication method allows your users to log in to your application with their Google, Facebook, or Apple accounts. This eliminates the need for them to memorize seed phrases for private key management. Once you initialize a user, Circle creates a wallet for them using multi-party computation (MPC) technology.
Additional social providersIf you want your application to offer a different social provider, join
Circle on Discord to make your
request.
Create a wallet with social logins
Circles handles the logic for social logins and requires you to:- Obtain the required IDs from the following providers:
- Google has a dedicated Client ID for Web, iOS, and Android platforms. See the Google doc: Get your Google API client ID.
- Facebook has an App ID. See the Facebook doc: Facebook App Development.
- Apple has a Bundle ID for iOS, and a Service ID for Web and Android platforms. See the Apple doc: Register an App ID.
- Add the IDs to the Circle Developer Console by navigating to Configurator > Authentication Methods > Social Logins.
- Ensure the ID settings for your application and the Console always match.
User onboarding and wallet creation process
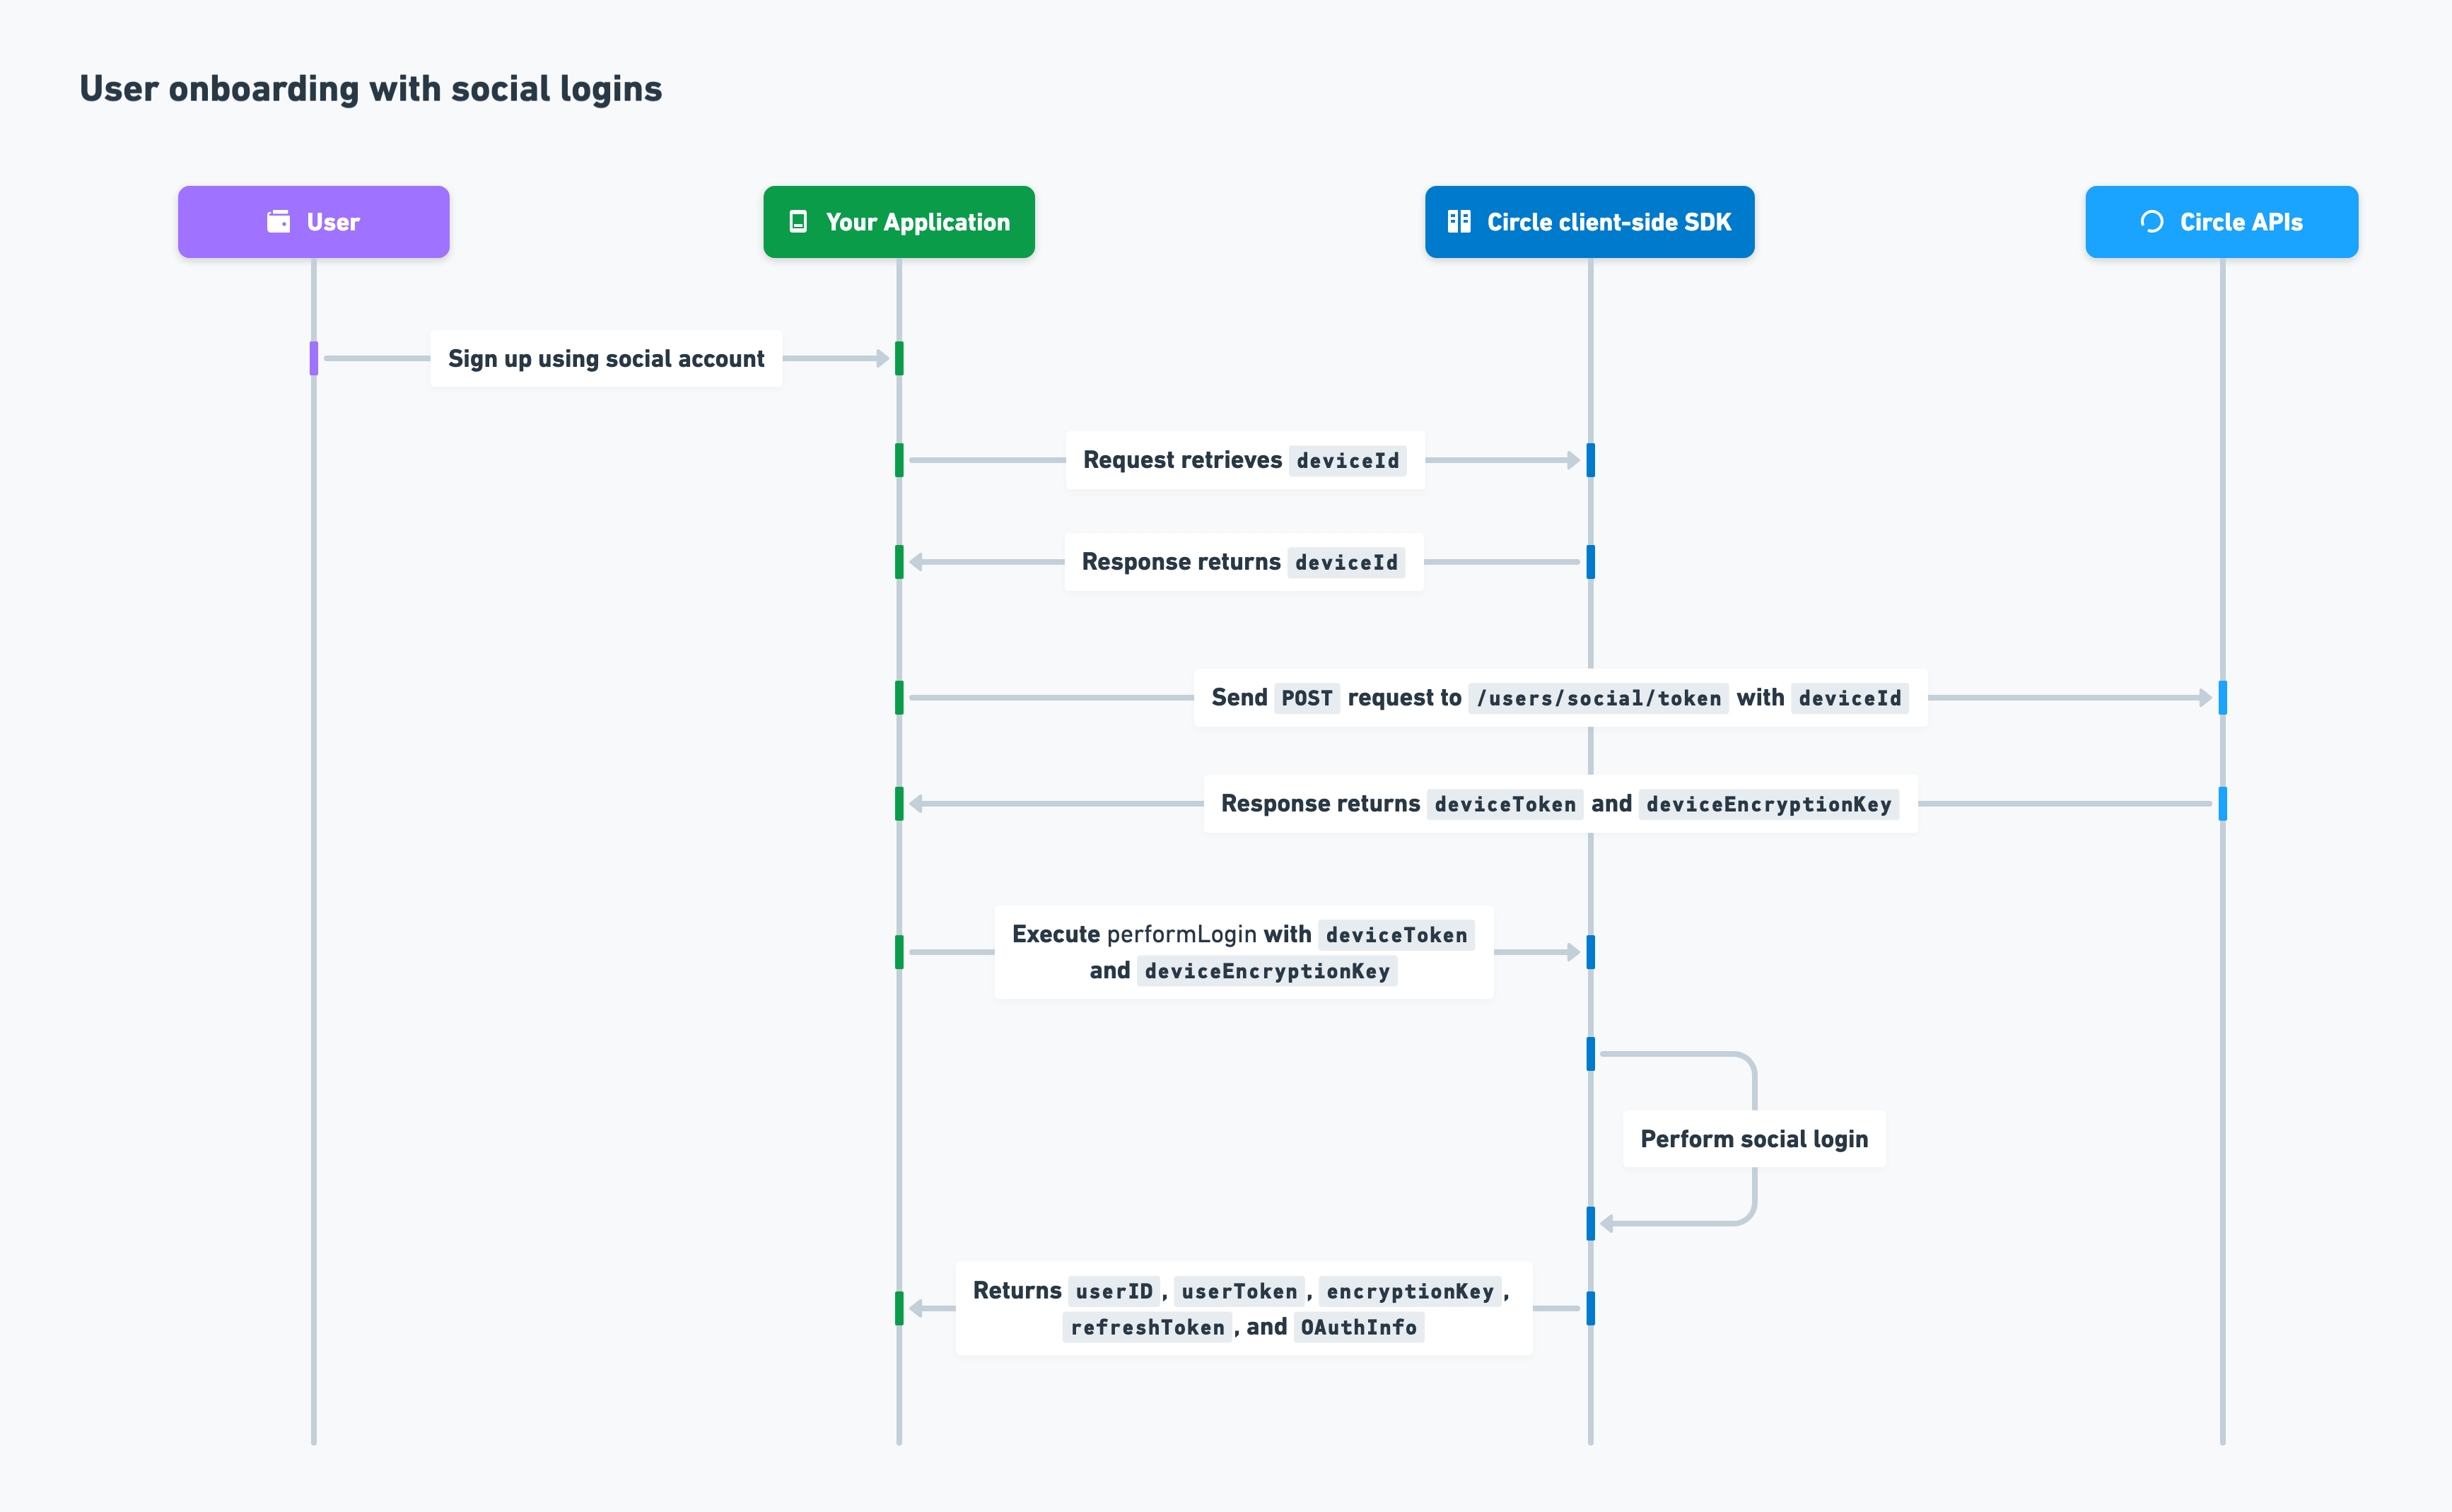
To test how to onboard a user and create a wallet with our sample app on web, see Quickstarts for Social Logins or Email Authentication.User onboarding with social logins
The process for onboarding a user with social logins onto your application is as follows:- You include your API key in a
POSTrequest to the/users/social/tokenendpoint withdeviceIdincluded in the request body. - Circle returns
deviceTokenanddeviceEncryptionKeyin the response. - You invoke the client-side SDK to execute
performLoginwithdeviceTokenanddeviceEncryptionKeyprovided. - Circle executes the Social login flow and returns
userID,userToken,encryptionKey,refreshToken, andOAuthInfo.
User initiation and wallet creation
After you’ve onboarded your user, you can initialize the user and create a wallet. The process is as follows:- To initialize the user, you send a
POSTrequest to the/user/initializeendpoint withuserTokenincluded in the request body. - Circle returns
challengeIdin the response. - You create a Web3 wallet for your user by passing
challengeIdto the client-side SDK for execution.


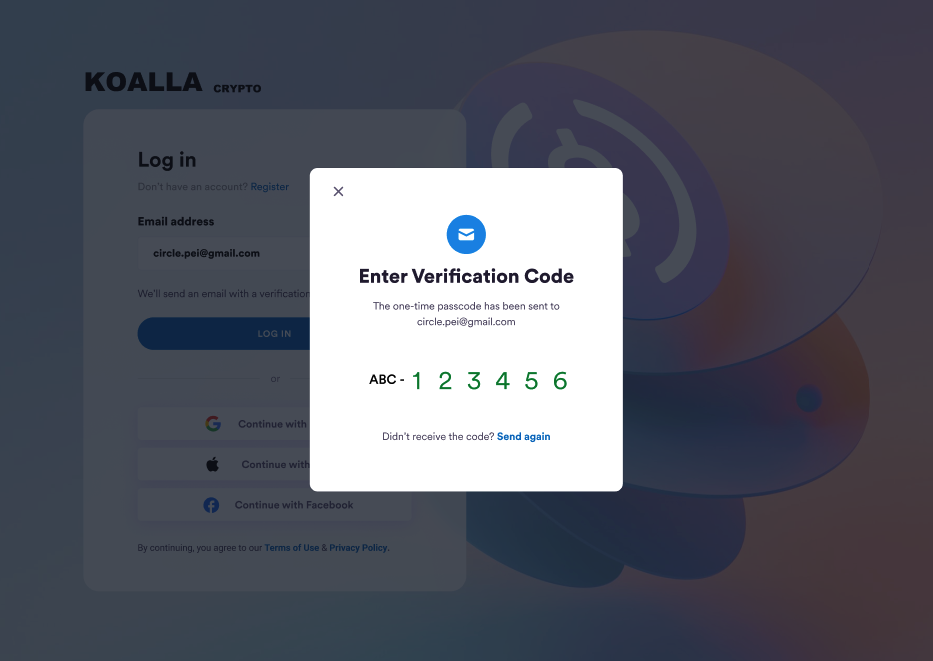
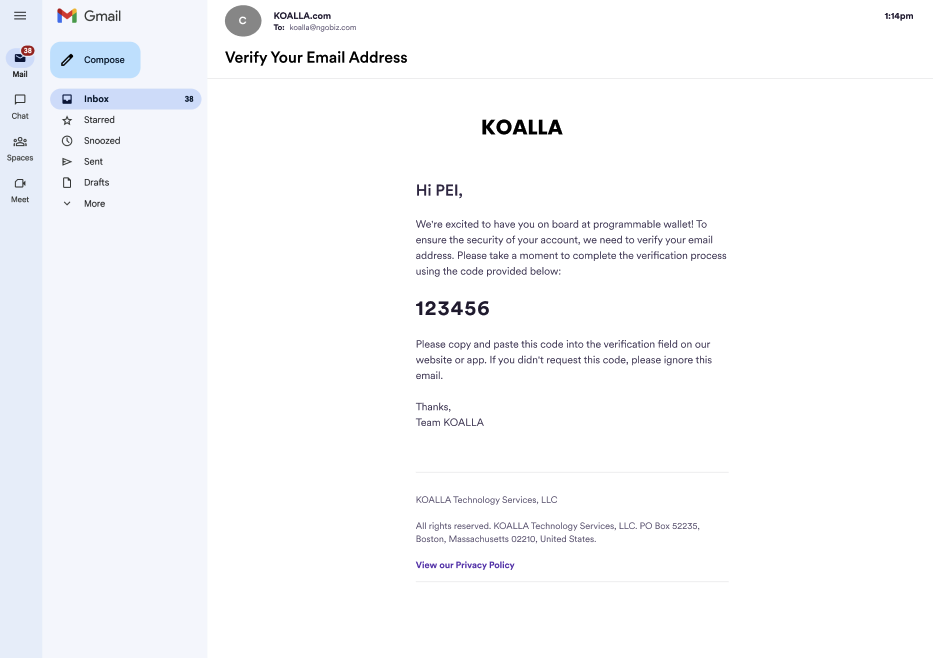
Customize UIThe verification code prompt is predefined by SDK. You can customize UI elements
including copy, color, and images. For more, see Web SDK UI Customizations.
Send againWhen Send again is selected, the SDK sends you an event to the registered
listener. You can then make a request to the
POST/users/email/resendOTP
endpoint, which emails the user a new OTP.Create a wallet with email
Before initializing the SDK:- Log in to the Circle Developer Console, then go to Wallets > User Controlled > Configurator > Email.
- Enter your SMTP data. Your SMTP credentials are always encrypted.
- Customize your OTP email content:
- Enter a From email address and Subject for the email’s subject line.
- Modify the content in the Email Template.
- Select SEND TEST EMAIL to send a OTP email and check if your template appears as expected.
User onboarding and wallet creation process
To test how to onboard a user and create a wallet with our sample app on web, see Quickstarts for Social Logins or Email Authentication.User onboarding with email
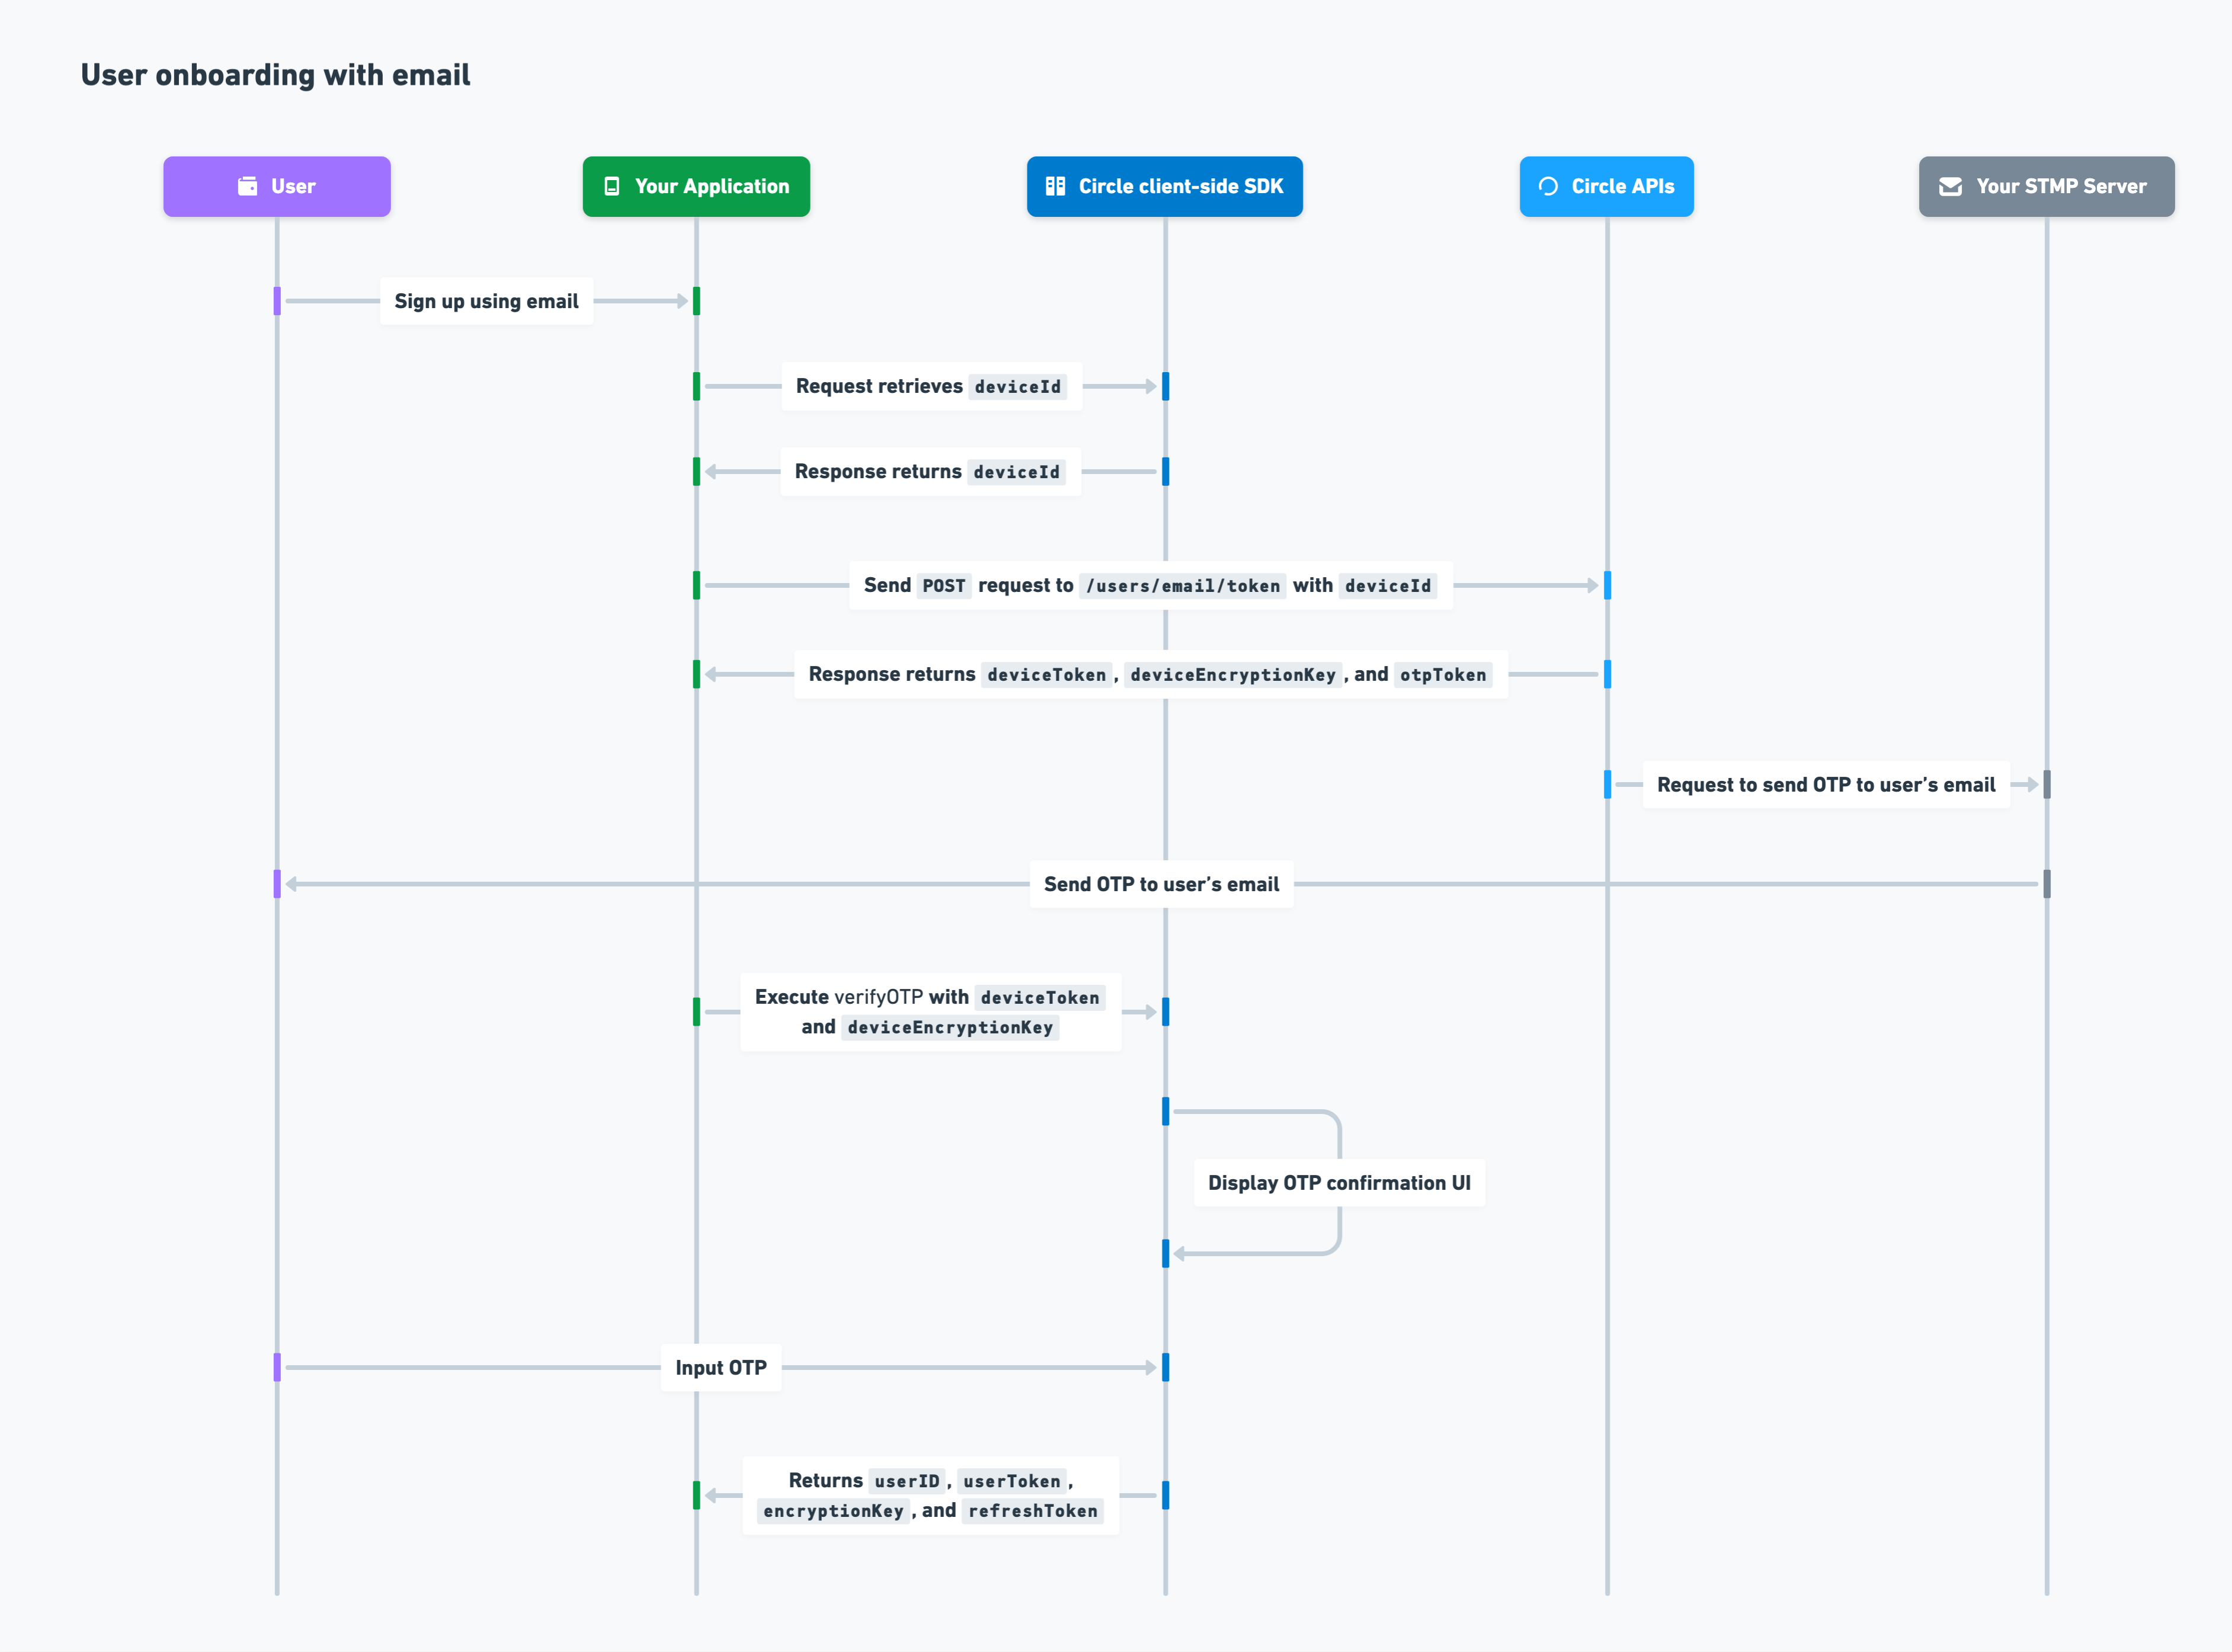
The process for onboarding a user with email onto your application is as follows:- You include your API key in a
POSTrequest to the/users/email/tokenendpoint withdeviceIdincluded in the request body. - Circle returns
otpToken,deviceToken, anddeviceEncryptionKeyin the response. - Circle requests your SMTP server to send an OTP email to your user’s email.
- You pass
verifyOTP,deviceToken, anddeviceEncryptionKeyto the client-side SDK. - Circle prompts your user to enter the OTP.
- Circle validates the OTP token and OTP and returns
userId. - Circle executes the SSO login flow and returns
userID,userToken,encryptionKey, andrefreshToken.
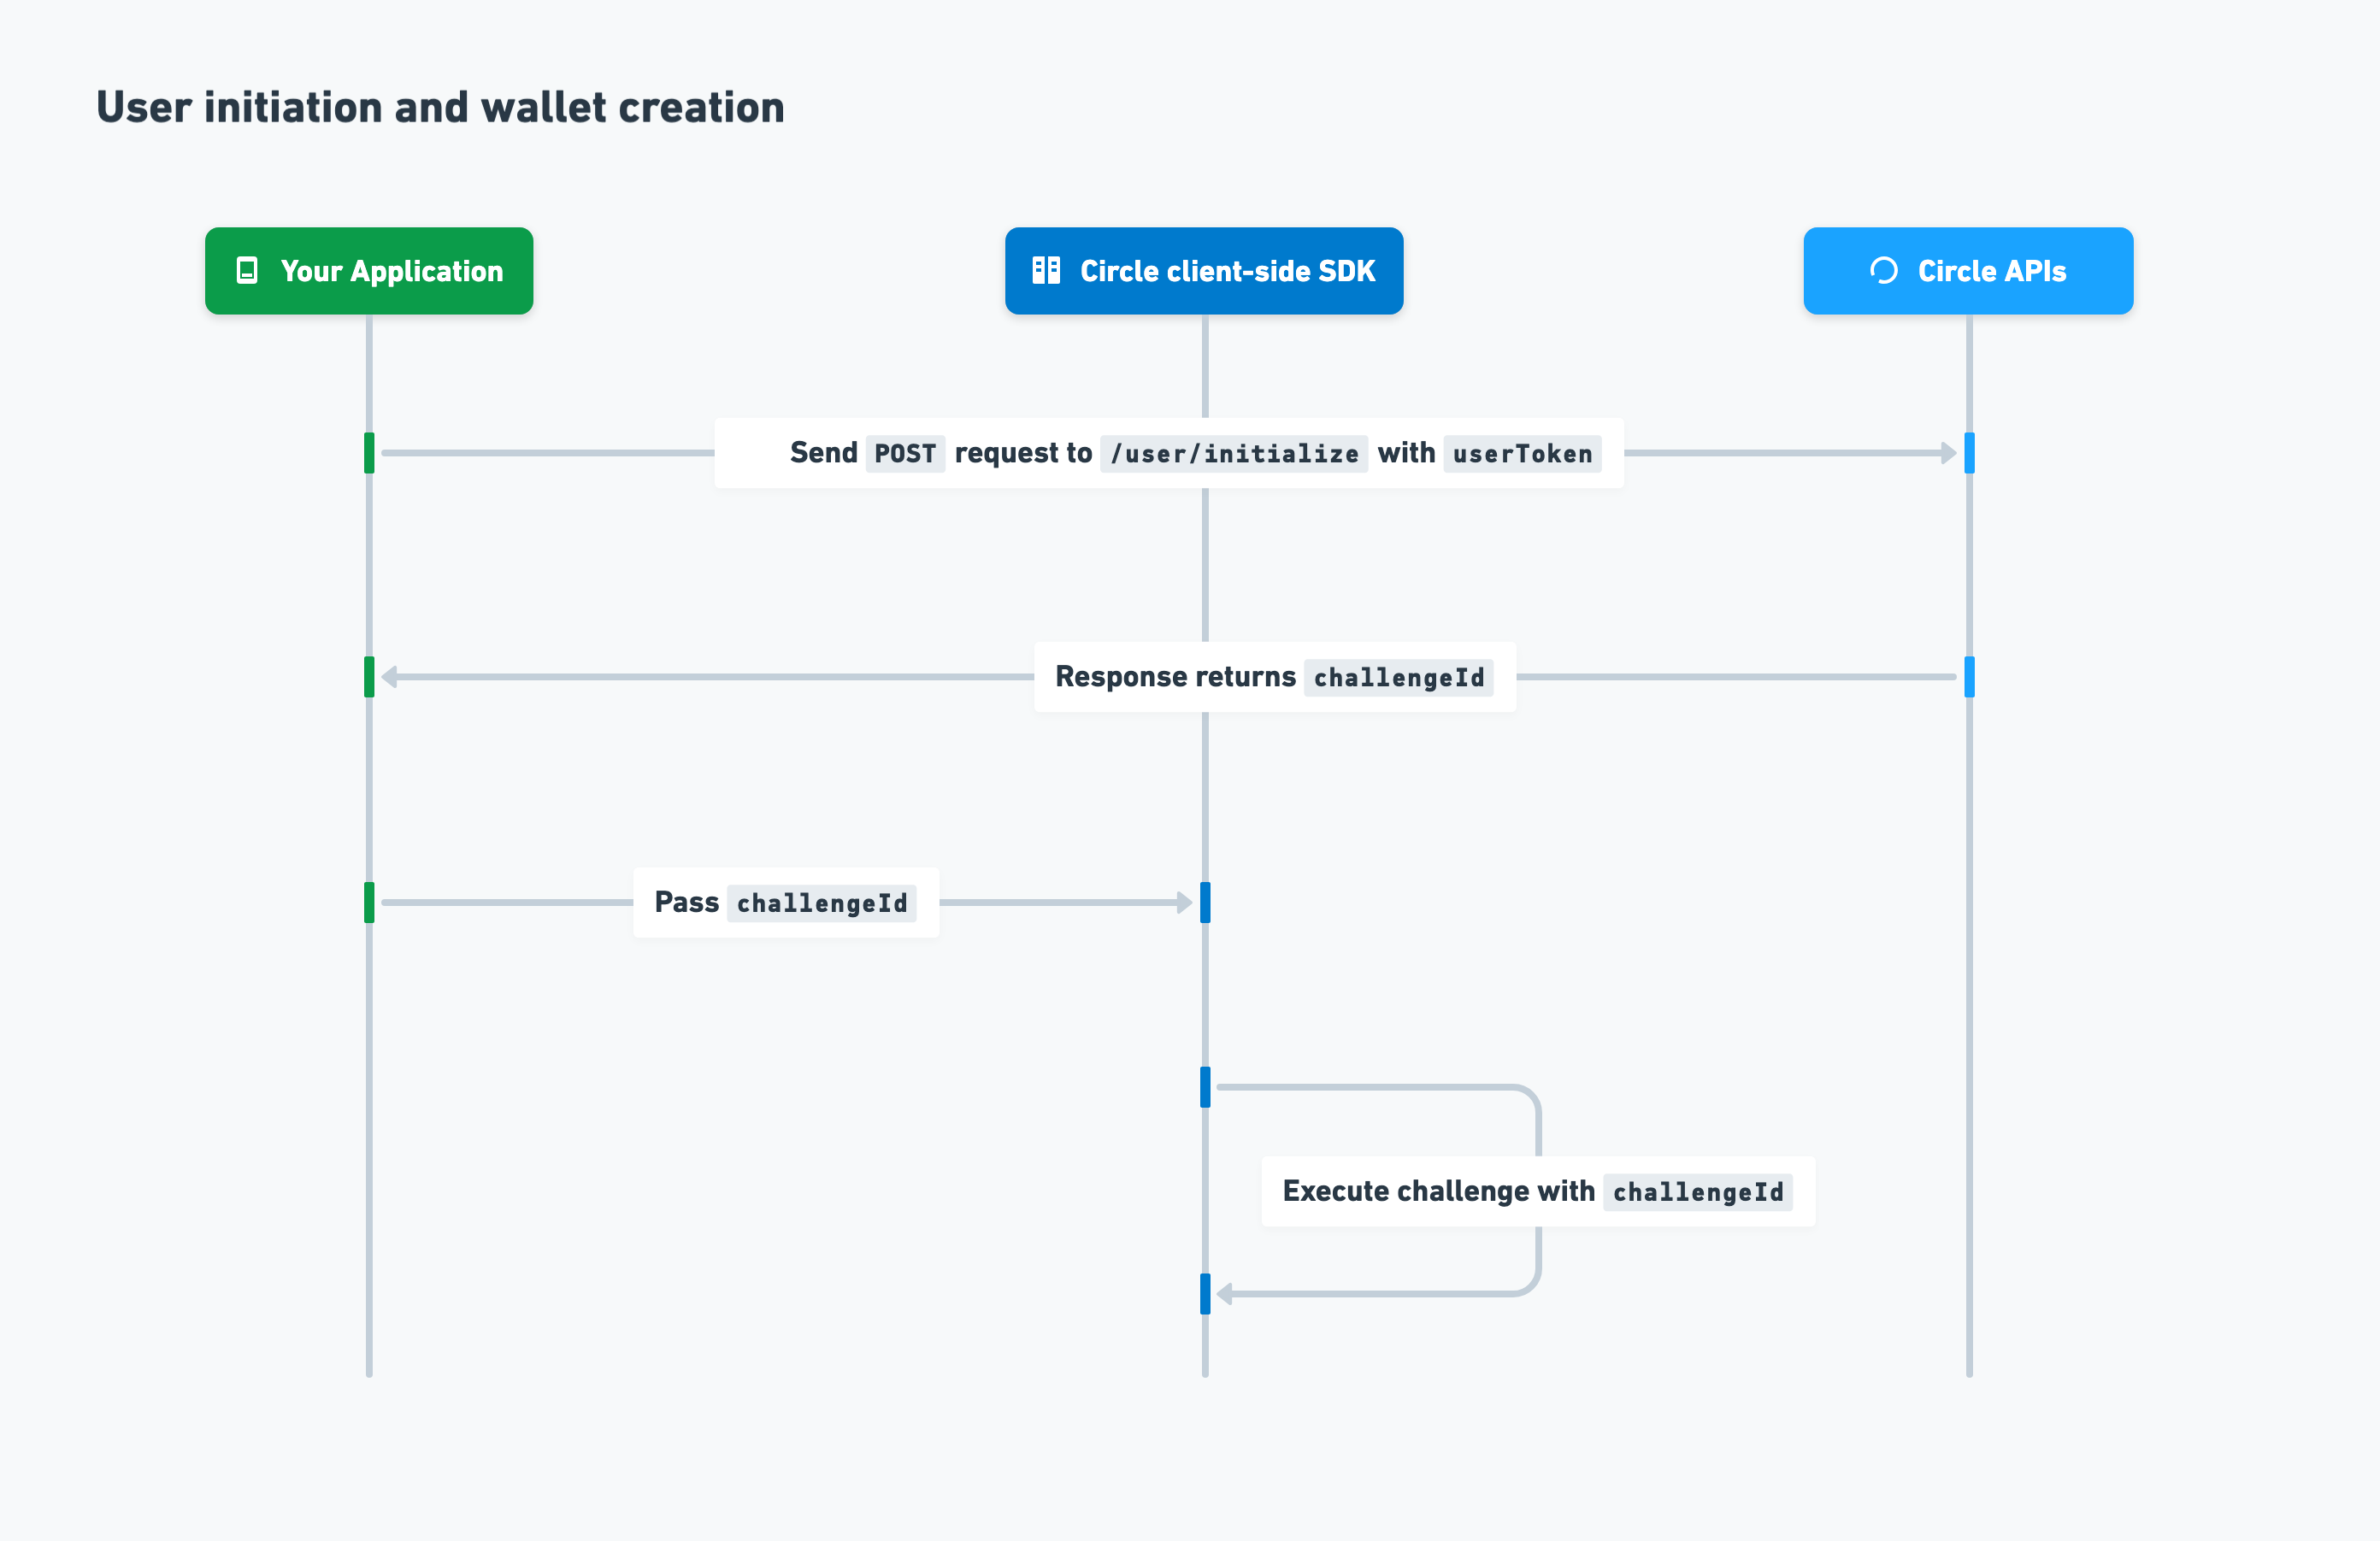
User initiation and wallet creation
After you’ve onboarded your user, you can initialize the user and create a wallet. The process is as follows:- To initialize the user, you send a
POSTrequest to the/user/initializeendpoint withuserTokenincluded in the request body. - Circle returns
challengeIdin the response. - You create a Web3 wallet for your user by passing
challengeIdto the client-side SDK for execution.
User token and refresh token
The refresh token concept is for social login and email authentication methods only. A user token is the session identifier. It automatically expires 14 days after it was generated. Upon expiration, your users are logged out of your application. To prevent your users from being logged out too frequently, you can include the existing live user token, its correspondingrefreshToken, and a new user token
in a POST request to the
/users/token/refresh
endpoint. The new user token is returned in the response.
PIN
Users invoke usage of their private keys through their specified PIN code when signing up for your application. The PIN is then used to encrypt and decrypt access to their private keys when creating a transaction on the blockchain. For more, see Quickstarts.About PIN
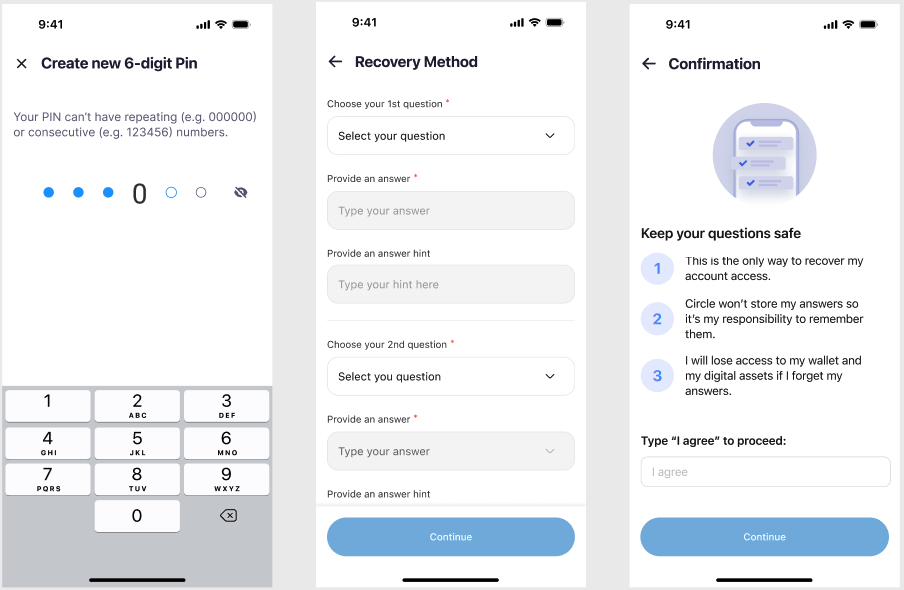
A PIN is a 6-digit code that is chosen by the user and is required to authorize interactions with their wallet. A PIN is encrypted as the user enters it on their device, which ensures no one else has access to their PIN. Since a PIN is required to access and authorize the movement of assets, it is extremely important that your users remember their PIN codes and never share it with anyone. If a user enters an incorrect PIN more than three times, the PIN is locked for 30 minutes.Biometrics
If you enable biometrics, your users can authorize signing actions using their fingerprint or facial recognition on their mobile devices. This means a PIN is no longer required for every transaction or signature request. Enabling biometrics enhances security, provides a better user experience, and reduces the likelihood of fraud. The following example UX screens show how users can authorize a purchase transaction with biometrics.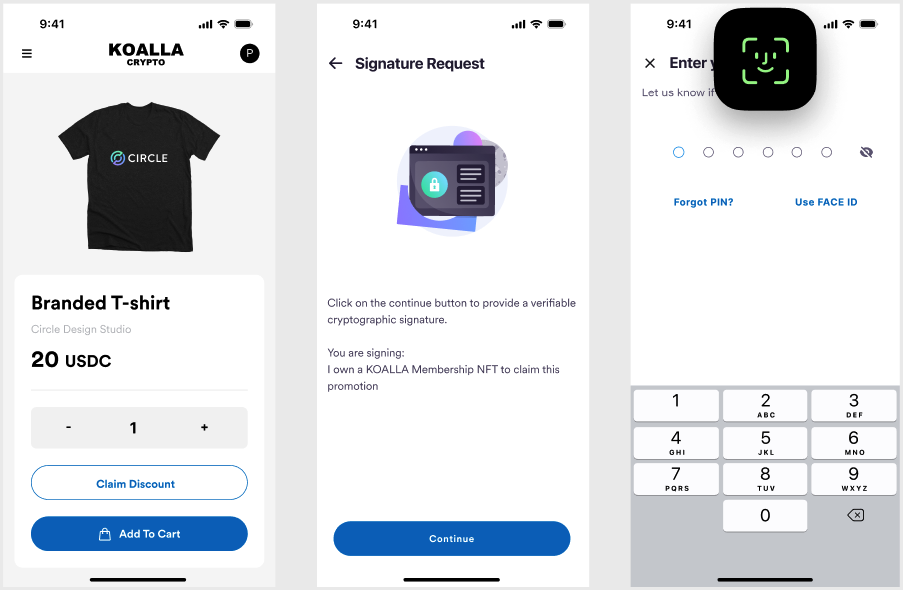
Wallet recovery through security questions
When signing up for your application, users set up answers to security questions after they specify their PIN. These answers are used in the wallet recovery process. If users lose or lock their PIN, they can unfreeze their wallets by going through the recovery process. They must answer their chosen security questions correctly. If the user incorrectly answers security questions more than three times, the recovery process locks for 30 minutes. The following example UX screens show how users can specify a PIN and recovery method during the onboarding process for your application.