> ## Documentation Index
> Fetch the complete documentation index at: https://circle-devdocs-test-ai-codegen-component.mintlify.site/llms.txt
> Use this file to discover all available pages before exploring further.
# Create Your First Wallet with Email
> Use API requests and Circle’s sample app to create a user-controlled wallet with email OTP
Learn how to initialize and create a user-controlled wallet using the email. To
create a wallet with social logins, see
[Create Your First Wallet with Social Logins](/wallets/user-controlled/create-your-first-wallet-with-social-logins).
This quickstart utilizes Circle’s sample application in combination with API
requests that can be sent using cURL requests or Circle's API references. cURL
requests are provided inline while API references call the API endpoints. For
more on how to use API references to make calls, see
[Testing API References](/api-reference/wallets/common/ping).
You can create both Smart Contract Accounts (SCA) and Externally Owned Accounts
(EOA) wallets. To learn more, see the [Account Type](/wallets/account-types)
guide.
## Prerequisites
Before you begin:
1. Create or sign in to your
[Circle Developer Console](https://console.circle.com/signup) account.
2. [Generate an API Key](/w3s/circle-developer-account#creating-a-developer-services-api-key).
3. Complete the
[Authentication Methods](/wallets/user-controlled/authentication-methods)
configurations before you set up the sample app.
This guide walks you through steps on how to create a wallet and perform
transactions or signatures, and provides sample code. You can use
[Circle's sample app](http://pw-auth-example.circle.com/) on web or set it up
locally.
You can view the sample app source code on GitHub:
* [React](https://github.com/circlefin/w3s-pw-web-sdk/tree/master/examples/react-example)
* [JavaScript (Vanilla)](https://github.com/circlefin/w3s-pw-web-sdk/tree/master/examples/js-example)
* [Vue.js](https://github.com/circlefin/w3s-pw-web-sdk/tree/master/examples/vue-example)
If you want to test in the iOS or Android environment, you can check the
GitHub repository for [iOS sample
app](https://github.com/circlefin/w3s-ios-sample-app-wallets) and [Android
sample app](https://github.com/circlefin/w3s-android-sample-app-wallets).
## Step 1. Configure the sample app
1. Select the **Email** tab.
2. Obtain an App ID. Either:
* From the Circle Developer Console, navigate to **Wallets > User Controlled >
Configurator** and copy **App ID**.
* Send a `GET` request to the `/config/entity` endpoint and copy the `appId`
from the response body.
3. Add the App ID to the sample app.
The sample app generates and pre-populates the device ID. During actual
implementation, you must retrieve it by calling the SDK method
[`getDeviceId`](/wallets/user-controlled/web-sdk#getdeviceid).
 ## Step 2. Configure SMTP settings and customize one-time passcode (OTP) email
1. From the Circle Developer Console, navigate to **Wallets > User Controlled >
Configurator**.
2. Select **Authentication Methods > Email**.
3. Enter your SMTP data.
4. Customize your OTP email content:
* Enter a **From** email address and **Subject** for the email’s subject
line.
* Modify the content in the **Email Template**.
## Step 3. Perform email login
1. Include your API key, `deviceId`, and email address in a `POST` request to
the `/users/email/token` endpoint.
```Text cURL theme={null}
curl --location 'https://api.circle.com/v1/w3s/users/email/token' \
--header 'Content-Type: application/json' \
--header `Authorization: Bearer ${your api key}` \
--data '{
"idempotencyKey": "3eeacdee-786c-4777-854d-6e457a060782",
"deviceId": "your device id"
}'
```
2. Copy `deviceToken`, `deviceEncryptionKey`, and `otpToken` from the response
and enter them into the sample app.
```Text Node.js theme={null}
{
deviceToken: string
deviceEncryptionKey: string
otpToken?: string // For email authentication method only
}
```
## Step 2. Configure SMTP settings and customize one-time passcode (OTP) email
1. From the Circle Developer Console, navigate to **Wallets > User Controlled >
Configurator**.
2. Select **Authentication Methods > Email**.
3. Enter your SMTP data.
4. Customize your OTP email content:
* Enter a **From** email address and **Subject** for the email’s subject
line.
* Modify the content in the **Email Template**.
## Step 3. Perform email login
1. Include your API key, `deviceId`, and email address in a `POST` request to
the `/users/email/token` endpoint.
```Text cURL theme={null}
curl --location 'https://api.circle.com/v1/w3s/users/email/token' \
--header 'Content-Type: application/json' \
--header `Authorization: Bearer ${your api key}` \
--data '{
"idempotencyKey": "3eeacdee-786c-4777-854d-6e457a060782",
"deviceId": "your device id"
}'
```
2. Copy `deviceToken`, `deviceEncryptionKey`, and `otpToken` from the response
and enter them into the sample app.
```Text Node.js theme={null}
{
deviceToken: string
deviceEncryptionKey: string
otpToken?: string // For email authentication method only
}
```
 3. On the sample app, select **Login with Email**. This takes you through the
OTP email flow:
* An email containing an OTP is sent to the email address specified in your
request to `/users/email/token`.
* The sample app prompts you with a UI to enter the OTP to verify identity,
which corresponds to the SDK method `verifyOTP`.
3. On the sample app, select **Login with Email**. This takes you through the
OTP email flow:
* An email containing an OTP is sent to the email address specified in your
request to `/users/email/token`.
* The sample app prompts you with a UI to enter the OTP to verify identity,
which corresponds to the SDK method `verifyOTP`.
 4. Once the OTP is verified, you are redirected back to the main page of the
sample app. The "Execute Challenge" section is now visible.
4. Once the OTP is verified, you are redirected back to the main page of the
sample app. The "Execute Challenge" section is now visible.
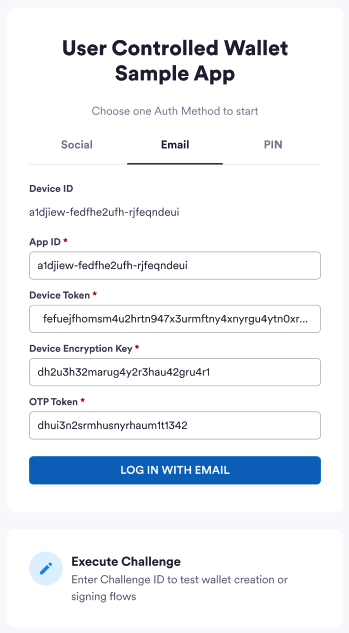 5. Select **Execute Challenge**.\
Both `encryptionKey` and `userToken` are pre-populated since these parameters
are required for the next step, which is to initialize the user.
5. Select **Execute Challenge**.\
Both `encryptionKey` and `userToken` are pre-populated since these parameters
are required for the next step, which is to initialize the user.
 The sample app pre-populates the `encryptionKey` and `userToken` for you.
During the actual development, the client-side SDK returns `userId`,
`userToken`, `encryptionKey`, and `refreshToken` to you.
## Step 4. Initialize user and acquire challenge ID
1. Include `userToken` copied from the previous step in a `POST` request to the
`/user/initialize` endpoint.
2. Copy `challengeId` from the response and enter it into the sample app.
To create an SCA wallet, provide a Testnet blockchain such as ETH-SEPOLIA,
MATIC-AMOY, and AVAX-FUJI.
### Amoy example
The following code samples show how to create an SCA wallet on Amoy and the
response.
```javascript Node.js SDK theme={null}
const response = await circleUserSdk.createUserPinWithWallets({
userToken: "",
accountType: "SCA",
blockchains: ["MATIC-AMOY"],
});
```
```coffeescript Python SDK theme={null}
# create an api instance
api_instance = user_controlled_wallets.UsersAndPinsApi(client)
try:
request = user_controlled_wallets.SetPinAndInitWalletRequest.from_dict({"accountType": 'SCA', "blockchains": ['MATIC-AMOY'], "idempotencyKey": str(uuid.uuid4()) })
response = api_instance.create_user_with_pin_challenge("", request)
print(response)
except user_controlled_wallets.ApiException as e:
print("Exception when calling UsersAndPinsApi->create_user_with_pin_challenge: %s\n" % e)
```
```curl cURL theme={null}
curl --request POST \
--url 'https://api.circle.com/v1/w3s/user/initialize' \
--header 'accept: application/json' \
--header 'content-type: application/json' \
--header 'authorization: Bearer ' \
--header 'X-User-Token: ' \
--data '
{
"idempotencyKey": "49e3f455-60a2-4b5e-9e9e-9400b86e5f34",
"accountType": "SCA",
"blockchains": [
"MATIC-MUMBAI"
]
}
'
```
```json Response Body theme={null}
{
"data": {
"challengeId": "0d1b5f41-1381-50af-983b-f54691415158"
}
}
```
### Solana example
The following code samples show how to create an EOA wallet on Solana and the
response.
```javascript Node.js SDK theme={null}
const response = await circleUserSdk.createUserPinWithWallets({
userToken: "",
accountType: "EOA",
blockchains: ["SOL-DEVNET"],
});
```
```coffeescript Python SDK theme={null}
# create an api instance
api_instance = user_controlled_wallets.UsersAndPinsApi(client)
try:
request = user_controlled_wallets.SetPinAndInitWalletRequest.from_dict({"accountType": 'EOA', "blockchains": ['SOL-DEVNET'], "idempotencyKey": str(uuid.uuid4()) })
response = api_instance.create_user_with_pin_challenge("", request)
print(response)
except user_controlled_wallets.ApiException as e:
print("Exception when calling UsersAndPinsApi->create_user_with_pin_challenge: %s\n" % e)
```
```curl cURL theme={null}
curl --request POST \
--url 'https://api.circle.com/v1/w3s/user/initialize' \
--header 'accept: application/json' \
--header 'content-type: application/json' \
--header 'authorization: Bearer ' \
--header 'X-User-Token: ' \
--data '
{
"idempotencyKey": "a6f4c8d2-33b1-43b0-8a46-5b14efe063d8",
"accountType": "EOA",
"blockchains": [
"SOL-DEVNET"
]
}
'
```
```json Response Body theme={null}
{
"data": {
"challengeId": "0d1b5f41-1381-50af-983b-f54691415158"
}
}
```
## Step 5. Create wallet
1. Paste the Challenge ID copied from the previous step into the sample app, and
select **Execute**.
2. An “Execute Successful” message is displayed on the sample app. A web3 wallet
is created for you users!
To execute a challenge during actual implementation, you must call the Web SDK
API `execute` with the `challengeId` returned from Circle. Also, make sure you
have an active `userToken` , `encryptionKey` for any challenge executions.
## Step 6. Check user and wallet status
Once you have created a wallet in the sample app, you can check the user and
wallet status.
To check the user's account status:
* Include `userToken` in a `GET` request to the `/user` endpoint to retrieve the
status of the user’s account.
```javascript Node.js SDK theme={null}
const response = await circleUserSdk.getUserStatus({
userToken: "",
});
```
```coffeescript Python SDK theme={null}
# create an api instance
api_instance = user_controlled_wallets.UsersAndPinsApi(client)
# get user by token
try:
response = api_instance.get_user_by_token("")
print(response)
except user_controlled_wallets.ApiException as e:
print("Exception when calling UsersAndPinsApi->get_user_by_token: %s\n" % e)
```
```curl cURL theme={null}
curl --request GET \
--url 'https://api.circle.com/v1/w3s/user' \
--header 'accept: application/json' \
--header 'content-type: application/json' \
--header 'authorization: Bearer ' \
--header 'X-User-Token: '
```
```json Response Body theme={null}
{
"data": {
"id": "2f1dcb5e-312a-4b15-8240-abeffc0e3463",
"status": "ENABLED",
"createDate": "2023-07-26T15:27:32Z",
"pinStatus": "ENABLED",
"pinDetails": {
"failedAttempts": 0
},
"securityQuestionStatus": "ENABLED",
"securityQuestionDetails": {
"failedAttempts": 0
}
}
}
```
To check the status of the user’s new wallet.
* Include `userToken` in a `GET` request to the `/wallets` endpoint to retrieve
the user’s new wallet.
```javascript Node.js SDK theme={null}
const response = await circleUserSdk.listWallets({
userToken: "",
});
```
```coffeescript Python SDK theme={null}
# create an api instance
api_instance = user_controlled_wallets.WalletsApi(client)
# get user token
try:
response = api_instance.list_wallets("")
print(response)
except user_controlled_wallets.ApiException as e:
print("Exception when calling WalletsApi->list_wallets: %s\n" % e)
```
```curl Curl theme={null}
curl --request GET \
--url 'https://api.circle.com/v1/w3s/wallets' \
--header 'accept: application/json' \
--header 'content-type: application/json' \
--header 'authorization: Bearer ' \
--header 'X-User-Token: '
```
### Amoy sample response
```json Response Body theme={null}
{
"data": {
"wallets": [
{
"id": "01899cf2-d415-7052-a207-f9862157e546",
"state": "LIVE",
"walletSetId": "01899cf2-d407-7f89-b4d9-84d63573f138",
"custodyType": "ENDUSER",
"userId": "2f1dcb5e-312a-4b15-8240-abeffc0e3463",
"address": "0x075e62c80e55d024cfd8fd4e3d1184834461db57",
"addressIndex": 0,
"blockchain": "MATIC-AMOY",
"accountType": "SCA",
"updateDate": "2023-07-28T14:41:47Z",
"createDate": "2023-07-28T14:41:47Z"
}
]
}
}
```
### Solana sample response
```json Response Body theme={null}
{
"data": {
"wallets": [
{
"id": "8a79c80b-4d4f-4032-971a-8bb9f9b0254f",
"state": "LIVE",
"walletSetId": "c43221d3-9db1-4cbf-8b18-e1dcae16b55d",
"custodyType": "ENDUSER",
"userId": "d8c8f832-5d4f-4123-9a7f-60120c2da5f0",
"address": "8UFfxP3zzSeqdkZ5iLTmUGzpHPRGnydZ1Vnq5GkzKTep",
"addressIndex": 0,
"blockchain": "SOL-DEVNET",
"accountType": "EOA",
"updateDate": "2023-07-28T14:43:48Z",
"createDate": "2023-07-28T14:43:48Z"
}
]
}
}
```
You can also view the User ID, Auth Method, and Wallet status on the
[Circle Developer Console](https://console.circle.com/):
1. From the Wallets section on the sidebar, select **User Controlled > Users**.
2. Select your user from the row. The wallet address is displayed.
The sample app pre-populates the `encryptionKey` and `userToken` for you.
During the actual development, the client-side SDK returns `userId`,
`userToken`, `encryptionKey`, and `refreshToken` to you.
## Step 4. Initialize user and acquire challenge ID
1. Include `userToken` copied from the previous step in a `POST` request to the
`/user/initialize` endpoint.
2. Copy `challengeId` from the response and enter it into the sample app.
To create an SCA wallet, provide a Testnet blockchain such as ETH-SEPOLIA,
MATIC-AMOY, and AVAX-FUJI.
### Amoy example
The following code samples show how to create an SCA wallet on Amoy and the
response.
```javascript Node.js SDK theme={null}
const response = await circleUserSdk.createUserPinWithWallets({
userToken: "",
accountType: "SCA",
blockchains: ["MATIC-AMOY"],
});
```
```coffeescript Python SDK theme={null}
# create an api instance
api_instance = user_controlled_wallets.UsersAndPinsApi(client)
try:
request = user_controlled_wallets.SetPinAndInitWalletRequest.from_dict({"accountType": 'SCA', "blockchains": ['MATIC-AMOY'], "idempotencyKey": str(uuid.uuid4()) })
response = api_instance.create_user_with_pin_challenge("", request)
print(response)
except user_controlled_wallets.ApiException as e:
print("Exception when calling UsersAndPinsApi->create_user_with_pin_challenge: %s\n" % e)
```
```curl cURL theme={null}
curl --request POST \
--url 'https://api.circle.com/v1/w3s/user/initialize' \
--header 'accept: application/json' \
--header 'content-type: application/json' \
--header 'authorization: Bearer ' \
--header 'X-User-Token: ' \
--data '
{
"idempotencyKey": "49e3f455-60a2-4b5e-9e9e-9400b86e5f34",
"accountType": "SCA",
"blockchains": [
"MATIC-MUMBAI"
]
}
'
```
```json Response Body theme={null}
{
"data": {
"challengeId": "0d1b5f41-1381-50af-983b-f54691415158"
}
}
```
### Solana example
The following code samples show how to create an EOA wallet on Solana and the
response.
```javascript Node.js SDK theme={null}
const response = await circleUserSdk.createUserPinWithWallets({
userToken: "",
accountType: "EOA",
blockchains: ["SOL-DEVNET"],
});
```
```coffeescript Python SDK theme={null}
# create an api instance
api_instance = user_controlled_wallets.UsersAndPinsApi(client)
try:
request = user_controlled_wallets.SetPinAndInitWalletRequest.from_dict({"accountType": 'EOA', "blockchains": ['SOL-DEVNET'], "idempotencyKey": str(uuid.uuid4()) })
response = api_instance.create_user_with_pin_challenge("", request)
print(response)
except user_controlled_wallets.ApiException as e:
print("Exception when calling UsersAndPinsApi->create_user_with_pin_challenge: %s\n" % e)
```
```curl cURL theme={null}
curl --request POST \
--url 'https://api.circle.com/v1/w3s/user/initialize' \
--header 'accept: application/json' \
--header 'content-type: application/json' \
--header 'authorization: Bearer ' \
--header 'X-User-Token: ' \
--data '
{
"idempotencyKey": "a6f4c8d2-33b1-43b0-8a46-5b14efe063d8",
"accountType": "EOA",
"blockchains": [
"SOL-DEVNET"
]
}
'
```
```json Response Body theme={null}
{
"data": {
"challengeId": "0d1b5f41-1381-50af-983b-f54691415158"
}
}
```
## Step 5. Create wallet
1. Paste the Challenge ID copied from the previous step into the sample app, and
select **Execute**.
2. An “Execute Successful” message is displayed on the sample app. A web3 wallet
is created for you users!
To execute a challenge during actual implementation, you must call the Web SDK
API `execute` with the `challengeId` returned from Circle. Also, make sure you
have an active `userToken` , `encryptionKey` for any challenge executions.
## Step 6. Check user and wallet status
Once you have created a wallet in the sample app, you can check the user and
wallet status.
To check the user's account status:
* Include `userToken` in a `GET` request to the `/user` endpoint to retrieve the
status of the user’s account.
```javascript Node.js SDK theme={null}
const response = await circleUserSdk.getUserStatus({
userToken: "",
});
```
```coffeescript Python SDK theme={null}
# create an api instance
api_instance = user_controlled_wallets.UsersAndPinsApi(client)
# get user by token
try:
response = api_instance.get_user_by_token("")
print(response)
except user_controlled_wallets.ApiException as e:
print("Exception when calling UsersAndPinsApi->get_user_by_token: %s\n" % e)
```
```curl cURL theme={null}
curl --request GET \
--url 'https://api.circle.com/v1/w3s/user' \
--header 'accept: application/json' \
--header 'content-type: application/json' \
--header 'authorization: Bearer ' \
--header 'X-User-Token: '
```
```json Response Body theme={null}
{
"data": {
"id": "2f1dcb5e-312a-4b15-8240-abeffc0e3463",
"status": "ENABLED",
"createDate": "2023-07-26T15:27:32Z",
"pinStatus": "ENABLED",
"pinDetails": {
"failedAttempts": 0
},
"securityQuestionStatus": "ENABLED",
"securityQuestionDetails": {
"failedAttempts": 0
}
}
}
```
To check the status of the user’s new wallet.
* Include `userToken` in a `GET` request to the `/wallets` endpoint to retrieve
the user’s new wallet.
```javascript Node.js SDK theme={null}
const response = await circleUserSdk.listWallets({
userToken: "",
});
```
```coffeescript Python SDK theme={null}
# create an api instance
api_instance = user_controlled_wallets.WalletsApi(client)
# get user token
try:
response = api_instance.list_wallets("")
print(response)
except user_controlled_wallets.ApiException as e:
print("Exception when calling WalletsApi->list_wallets: %s\n" % e)
```
```curl Curl theme={null}
curl --request GET \
--url 'https://api.circle.com/v1/w3s/wallets' \
--header 'accept: application/json' \
--header 'content-type: application/json' \
--header 'authorization: Bearer ' \
--header 'X-User-Token: '
```
### Amoy sample response
```json Response Body theme={null}
{
"data": {
"wallets": [
{
"id": "01899cf2-d415-7052-a207-f9862157e546",
"state": "LIVE",
"walletSetId": "01899cf2-d407-7f89-b4d9-84d63573f138",
"custodyType": "ENDUSER",
"userId": "2f1dcb5e-312a-4b15-8240-abeffc0e3463",
"address": "0x075e62c80e55d024cfd8fd4e3d1184834461db57",
"addressIndex": 0,
"blockchain": "MATIC-AMOY",
"accountType": "SCA",
"updateDate": "2023-07-28T14:41:47Z",
"createDate": "2023-07-28T14:41:47Z"
}
]
}
}
```
### Solana sample response
```json Response Body theme={null}
{
"data": {
"wallets": [
{
"id": "8a79c80b-4d4f-4032-971a-8bb9f9b0254f",
"state": "LIVE",
"walletSetId": "c43221d3-9db1-4cbf-8b18-e1dcae16b55d",
"custodyType": "ENDUSER",
"userId": "d8c8f832-5d4f-4123-9a7f-60120c2da5f0",
"address": "8UFfxP3zzSeqdkZ5iLTmUGzpHPRGnydZ1Vnq5GkzKTep",
"addressIndex": 0,
"blockchain": "SOL-DEVNET",
"accountType": "EOA",
"updateDate": "2023-07-28T14:43:48Z",
"createDate": "2023-07-28T14:43:48Z"
}
]
}
}
```
You can also view the User ID, Auth Method, and Wallet status on the
[Circle Developer Console](https://console.circle.com/):
1. From the Wallets section on the sidebar, select **User Controlled > Users**.
2. Select your user from the row. The wallet address is displayed.