> ## Documentation Index
> Fetch the complete documentation index at: https://circle-devdocs-test-ai-codegen-component.mintlify.site/llms.txt
> Use this file to discover all available pages before exploring further.

# Developer Controlled Wallets

export const FeedbackButton = () => {
  const [isOpen, setIsOpen] = useState(false);
  const [isRequestOpen, setIsRequestOpen] = useState(false);
  const [rating, setRating] = useState(null);
  const [completed, setCompleted] = useState(false);
  const [requestType, setRequestType] = useState('');
  const handleSubmitProposal = () => {
    setIsOpen(false);
    setIsRequestOpen(true);
  };
  return <>
      <button className="feedback-button" onClick={() => setIsOpen(true)}>
        Give Feedback
      </button>

      {isOpen && <div className="feedback-modal-overlay" onClick={() => setIsOpen(false)}>
          <div className="feedback-modal" onClick={e => e.stopPropagation()}>
            <button className="feedback-modal-close" onClick={() => setIsOpen(false)}>
              ×
            </button>

            <h2 className="feedback-modal-title">Give Feedback</h2>

            <div className="feedback-form">
              <div className="feedback-field">
                <label className="feedback-label">Email address</label>
                <input type="email" className="feedback-input" placeholder="" />
              </div>

              <div className="feedback-checkbox">
                <input type="checkbox" id="completed" checked={completed} onChange={e => setCompleted(e.target.checked)} />
                <label htmlFor="completed">I completed the Interactive Tutorial</label>
              </div>

              <div className="feedback-field">
                <label className="feedback-label">How helpful did you find the Interactive Tutorial?</label>
                <div className="feedback-rating">
                  <span className="feedback-rating-label">Not helpful</span>
                  {[1, 2, 3, 4, 5].map(value => <label key={value} className="feedback-rating-option">
                      <input type="radio" name="rating" value={value} checked={rating === value} onChange={() => setRating(value)} />
                      <span className="feedback-rating-number">{value}</span>
                    </label>)}
                  <span className="feedback-rating-label">Helpful</span>
                </div>
              </div>

              <div className="feedback-field">
                <label className="feedback-label">Your feedback</label>
                <textarea className="feedback-textarea" rows="5" placeholder="" />
              </div>

              <button className="feedback-submit">
                SEND MESSAGE
              </button>

              <div className="feedback-footer">
                <div className="feedback-footer-section">
                  <div className="feedback-footer-title">Reach out directly</div>
                  <a href="mailto:customer-support@circle.com" className="feedback-footer-link">
                    customer-support@circle.com
                  </a>
                </div>
                <div className="feedback-footer-section">
                  <div className="feedback-footer-title">Join our Discord community</div>
                  <a href="https://discord.com/invite/buildoncircle" className="feedback-footer-link feedback-footer-link-discord">
                    <span className="discord-icon">
                      <Icon icon="discord" iconType="brands" size={16} color="#fff" />
                    </span>
                    Join Discord
                  </a>
                </div>
                <div className="feedback-footer-section">
                  <div className="feedback-footer-title">Have a feature or docs request?</div>
                  <button onClick={handleSubmitProposal} className="feedback-footer-link feedback-footer-button">
                    Submit a proposal
                  </button>
                </div>
              </div>
            </div>
          </div>
        </div>}

      {isRequestOpen && <div className="feedback-modal-overlay" onClick={() => setIsRequestOpen(false)}>
          <div className="request-modal" onClick={e => e.stopPropagation()}>
            <button className="feedback-modal-close" onClick={() => setIsRequestOpen(false)}>
              ×
            </button>

            <h2 className="request-modal-title">Make a request</h2>

            <p className="request-modal-subtitle">
              Thank you for taking the time to fill out this survey. We look forward to seeing what you build 🚀
            </p>

            <div className="request-form">
              <label className="request-label">What best describes your request?</label>

              <label className="request-option">
                <input type="radio" name="request-type" value="feature" checked={requestType === 'feature'} onChange={e => setRequestType(e.target.value)} />
                <div className="request-option-content">
                  <span className="request-option-icon">🏗️</span>
                  <div className="request-option-text">
                    <strong>Feature Request:</strong> a new capability or improvement to the product
                  </div>
                </div>
              </label>

              <label className="request-option">
                <input type="radio" name="request-type" value="content" checked={requestType === 'content'} onChange={e => setRequestType(e.target.value)} />
                <div className="request-option-content">
                  <span className="request-option-icon">📖</span>
                  <div className="request-option-text">
                    <strong>Content Request:</strong> creation, update, or optimization of informational or educational content related to the product
                  </div>
                </div>
              </label>

              <label className="request-option">
                <input type="radio" name="request-type" value="community" checked={requestType === 'community'} onChange={e => setRequestType(e.target.value)} />
                <div className="request-option-content">
                  <span className="request-option-icon">🌐</span>
                  <div className="request-option-text">
                    <strong>Community Request:</strong> ideas on how we can improve our community, for example additional workshops or events
                  </div>
                </div>
              </label>

              <button className="request-next-button">
                Next
              </button>
            </div>
          </div>
        </div>}
    </>;
};

export const FeatureItem = ({title, icon, iconColor = '#1061a6', children, iconSize = 20, iconType = 'regular', href}) => {
  const titleContent = href ? <a href={href} target="_blank" rel="noopener noreferrer">
      {title}
      <Icon icon="arrow-up-right-from-square" size={12} className="feature-link-icon" />
    </a> : title;
  return <div className="feature-item">
      <div className={`feature-icon`}>
        <Icon icon={icon} size={iconSize} color={iconColor} iconType={iconType} />
      </div>
      <div className="feature-content">
        <h3 className="feature-title">{titleContent}</h3>
        <div className="feature-description">
          {children}
        </div>
      </div>
    </div>;
};

export const FeatureGrid = ({children, cols = 2, backgroundColor}) => {
  const columns = cols === 1 ? 1 : 2;
  return <div className="feature-grid-container" style={backgroundColor ? {
    backgroundColor
  } : {}}>
      <div className="feature-grid" data-cols={columns} style={{
    gridTemplateColumns: `repeat(${columns}, 1fr)`
  }}>
        {children}
      </div>
    </div>;
};

## Introduction

Circle's Cross-Chain Transfer Protocol (CCTP) facilitates the transfer of USDC
between distinct blockchains, providing a more streamlined experience. By
integrating CCTP with Circle Wallets in your applications, you enable seamless
USDC transactions across multiple chains. This reduces the need for users to
manage separate wallets for different blockchains, potentially broadening your
audience and providing increased liquidity and adaptability. It's designed to
provide users with a cohesive and efficient digital currency experience.

<FeatureGrid cols={2}>
  <FeatureItem title="Advanced Security" icon="lock" iconType="solid">
    Benefit from MPC technology, which eliminates single points of failure and enhances security against unauthorized access and theft.
  </FeatureItem>

  <FeatureItem title="Innovative Blockchain Functionality" icon="sparkles">
    Grant users access to digital currencies, NFTs, and other blockchain-powered experiences with ease.
  </FeatureItem>

  <FeatureItem title="Blockchain Agnostic" icon="circle-dollar">
    Build once, deploy across multiple blockchains, such as Ethereum, Polygon, and Avalanche.
  </FeatureItem>

  <FeatureItem title="Reliable Operations Monitoring" icon="shield-exclamation">
    Built-in transaction logs, user-level monitoring, and error reporting help you troubleshoot and support your users effectively.
  </FeatureItem>

  <FeatureItem title="Instant Access" icon="bolt">
    Get started immediately, with pay-as-you-go pricing and no upfront fees or contracts.
  </FeatureItem>
</FeatureGrid>

***

## Prerequisites

Before you get started, ensure that you have:

* Have a
  [Developer Services account](/interactive-quickstarts/get-started#create-a-developer-services-account)
* Created your [API key](/interactive-quickstarts/get-started#create-your-api-key)
* (Optional) Install the applicable [Server-side SDK](/sdk-explorer) (required
  if you register Entity Secret via SDK)

<CodeGroup>
  ```javascript Node.js theme={null}
  // Developer Controlled Wallets
  npm install @circle-fin/developer-controlled-wallets --save
  // User Controlled Wallets
  npm install @circle-fin/user-controlled-wallets --save
  // Contracts
  npm install @circle-fin/smart-contract-platform --save
  ```

  ```python Python theme={null}
  #Developer Controlled Wallets
  pip install --upgrade circle-developer-controlled-wallets
  #User Controlled Wallets
  pip install --upgrade circle-user-controlled-wallets
  #Contracts
  pip install --upgrade circle-smart-contract-platform
  ```
</CodeGroup>

***

## Setup your Entity Secret

The Entity Secret is an integral component in developer-controlled wallets,
serving as a key element in bolstering security.

### What is the Entity Secret?

The Entity Secret is a robust 32-byte key engineered to enhance the security
mechanisms of developer-controlled wallets. Its value lies not only in its
complexity but also in the specific security benefits it confers.

### The importance of the Entity Secret

<FeatureGrid cols={1} backgroundColor="transparent">
  <FeatureItem title="Exclusivity" icon="lock" iconType="solid">
    The Entity Secret is generated by you and remains known exclusively to
    you. Consider it as your private password or a cryptographic signature
    that distinguishes your activities.
  </FeatureItem>

  <FeatureItem title="Enhanced Security for Critical API Requests" icon="shield-check">
    For critical actions such as wallet creation or initiating transactions,
    the Entity Secret comes into play. Attaching an encrypted version of the
    Entity Secret to these API requests provides an added authentication
    factor, reinforcing the security infrastructure.
  </FeatureItem>

  <FeatureItem title="Dynamic Protection" icon="key">
    With a requirement to re-encrypt the Entity Secret for each API request,
    you avoid the risks associated with having a static key, which could be
    vulnerable to security breaches. This dynamic approach means that every
    request is identifiably distinct, providing fortified protection against
    potential attacks.
  </FeatureItem>

  <FeatureItem title="Sole Authority" icon="user">
    While our platform enables operations using the Entity Secret, it does not
    store it. This design choice comes with dual implications: First, it
    ensures you are the sole entity capable of using your private keys, thus
    preserving absolute control over them. Second, it places the
    responsibility squarely on your shoulders to secure the Entity Secret
    conscientiously, as its security is paramount to the overall protection of
    your developer-controlled wallets.
  </FeatureItem>
</FeatureGrid>

### Balancing Power with Responsibility as a Developer

The Entity Secret embodies the level of trust and authority that our platform
confers upon developers. It enables smooth access to the extensive capabilities
of developer-controlled wallets, while simultaneously ensuring their security is
maintained. However, great power necessitates equally great responsibility. The
safeguarding, encryption, and periodic renewal of the Entity Secret are duties
that rest with you, the developer.

This dynamic of empowering developers while also entrusting them with critical
security tasks reflects the core principles of decentralization intrinsic to the
web3 ecosystem. As a developer, you're more than a creator; you assume the role
of a guardian of security and a proponent of distributed authority.

<Note>
  Should you sense the weight of this role, rest assured that guidance is at hand.
  We are here to support you in effectively managing and protecting your Entity
  Secret.
</Note>

### Generating the Entity Secret

<CodeGroup>
  ```javascript NodeJS SDK theme={null}
  import { generateEntitySecret } from "@circle-fin/developer-controlled-wallets";
  // This will print a new entity secret in the terminal
  generateEntitySecret();
  ```

  ```python Python SDK theme={null}
  from circle.web3 import utils
  # This will print a new entity secret in the terminal
  utils.generate_entity_secret()
  ```

  ```javascript NodeJS theme={null}
  import crypto from "crypto";
    
  const secret = crypto.randomBytes(32).toString('hex')

  console.log(secret)
  ```

  ```javascript JavaScript theme={null}
  let array = new Uint8Array(32)
  window.crypto.getRandomValues(array)
  let secret = Array.from(array)
    .map((b) => b.toString(16).padStart(2, '0'))
    .join('')

  console.log(secret)
  ```

  ```bash Bash theme={null}
  openssl rand -hex 32
  ```

  ```python Python theme={null}
  import os

  secret = os.urandom(32).hex()

  print(secret) 
  ```

  ```go Go theme={null}
  package main

  import (
  	"crypto/rand"
  	"fmt"
  	"io"
  )

  func generateRandomHex() []byte { 
    mainBuff := make([]byte, 32) 
    _, err := io.ReadFull(rand.Reader, mainBuff) 
    if err != nil { 
      panic("reading from crypto/rand failed: " + err.Error())
    }
    return mainBuff
  }

  // The following sample codes generate a distinct hex encoded entity secret with each execution
  // The generation of entity secret only need to be executed once unless you need to rotate entity secret.
  func main() { 
    entitySecret := generateRandomHex()
    fmt.Printf("Hex encoded entity secret: %x\n", entitySecret)
  }
  ```
</CodeGroup>

## ⚠️ Generate your own Entity Secret

### ⚠️ ADD CODE SNIPPET HERE

<Warning>
  It's crucial to safeguard your Entity Secret akin to a key to your
  home—misplacing it or divulging it to others could have serious ramifications.
  Ensure you securely store the Entity Secret because you'll require it shortly to
  create an Entity Secret Ciphertext. Just as the name implies, the Entity Secret
  is sensitive information; treat it with the utmost confidentiality and security
  to prevent unauthorized access or use.
</Warning>

With your Entity Secret now created, we're ready to advance to a critical
juncture. You're about to convert the Entity Secret into Ciphertext and register
it with the system. This process sets the stage for you to create your first
wallet—a milestone to look forward to.

### Retrieving Your Entity's Public Key (Optional if registering with SDK)

Begin by acquiring your entity's public key. This key is retrievable via our
APIs and is instrumental in the upcoming steps. To obtain it, use your API key
for authentication. The entity's public key plays a crucial role as it encrypts
your Entity Secret. Once encrypted, the Entity Secret remains secure, ensuring
the information is shared exclusively between you and the platform, keeping it
out of reach from outsiders.

## ⚠️ Fetching your public key

### ⚠️ ADD CODE SNIPPET HERE

### Encrypting the Entity Secret and Encoding in Base64 (Optional if registering with SDK)

After obtaining the public key, the next step involves using RSA encryption to
secure your Entity Secret. Follow these steps:

<Steps>
  <Step title="Encrypt the Entity Secret">
    Employ RSA encryption with the public key to encrypt your Entity Secret.
    This cryptographic process ensures that the secret is encoded in such a way
    that only someone with the private key can decrypt it.
  </Step>

  <Step title="Encode as Base64">
    After encryption, convert the encrypted data into Base64 format. Encoding in
    Base64 ensures the encrypted data can be safely conveyed and interpreted in
    various contexts, including those that may not handle binary data well.
  </Step>

  <Step title="Verify the Ciphertext Length">
    Ensure that the generated Ciphertext is 684 characters in length. This
    specific length confirms the encryption process has been executed properly
    and that the data will be maintained correctly upon receipt.
  </Step>
</Steps>

The code provided will assist in automating this encryption process, generating
a unique Entity Secret Ciphertext every time it is executed. The resulting
Ciphertext is what you'll use to interact securely with the platform's API when
performing operations that require it.

<CodeGroup title="Encrypt your Entity Secret">
  ```javascript NodeJS theme={null}
  // npm install node-forge -S

  import forge from "node-forge";

  const entitySecret = forge.util.hexToBytes('YOUR_ENTITY_SECRET');

  const publicKey = forge.pki.publicKeyFromPem('YOUR_PUBLIC_KEY');

  const encryptedData = publicKey.encrypt(entitySecret, 'RSA-OAEP', { md: forge.md.sha256.create(), mgf1: { md: forge.md.sha256.create(), }, });

  console.log(forge.util.encode64(encryptedData)) 
  ```

  ```python Python theme={null}
  import base64
  import codecs
  # Installed by \`pip install pycryptodome\`
  from Crypto.PublicKey import RSA
  from Crypto.Cipher import PKCS1_OAEP
  from Crypto.Hash import SHA256

  # Paste your entity public key here.
  public_key_string = 'PASTE_YOUR_PUBLIC_KEY_HERE'
  # If you already have a hex encoded entity secret, you can paste it here. the length of the hex string should be 64.
  hex_encoded_entity_secret = 'PASTE_YOUR_HEX_ENCODED_ENTITY_SECRET_KEY_HERE'
  # The following sample codes generate a distinct entity secret ciphertext with each execution.
  if **name** == '**main**': 
    entity_secret = bytes.fromhex(hex_encoded_entity_secret)
    if len(entity_secret) != 32:
  		print("invalid entity secret")
  		exit(1)
  	public_key = RSA.importKey(public_key_string)

  	# encrypt data by the public key
  	cipher_rsa = PKCS1_OAEP.new(key=public_key, hashAlgo=SHA256)
  	encrypted_data = cipher_rsa.encrypt(entity_secret)

  	# encode to base64
  	encrypted_data_base64 = base64.b64encode(encrypted_data)
  	print("Hex encoded entity secret:", codecs.encode(entity_secret, 'hex').decode())
  	print("Entity secret ciphertext:", encrypted_data_base64.decode())
  ```

  ```go Go theme={null}
  package main

  import (
  	"crypto/rand"
  	"crypto/rsa"
  	"crypto/sha256"
  	"crypto/x509"
  	"encoding/base64"
  	"encoding/hex"
  	"encoding/pem"
  	"errors"
  	"fmt"
  )
  // Paste your entity public key here. var publicKeyString = "PASTE_YOUR_PUBLIC_KEY_HERE"
  // If you already have a hex encoded entity secret, you can paste it here. the length of the hex string should be 64. var hexEncodedEntitySecret = "PASTE_YOUR_HEX_ENCODED_ENTITY_SECRET_KEY_HERE"
  // The following sample codes generate a distinct entity secret ciphertext with each execution 
  func main() { 
    entitySecret, err := hex.DecodeString(hexEncodedEntitySecret) 
    if err != nil { 
      panic(err) 
    } 

    if len(entitySecret) != 32 { 
      panic("invalid entity secret") 
    } 

    pubKey, err := ParseRsaPublicKeyFromPem([]byte(publicKeyString)) 
    if err != nil {
      panic(err)
    } 

    cipher, err := EncryptOAEP(pubKey, entitySecret) 
    if err != nil { 
      panic(err)
    }
    fmt.Printf("Hex encoded entity secret: %x", entitySecret)
    fmt.Printf("Entity secret ciphertext: %s", base64.StdEncoding.EncodeToString(cipher))
  }

  // ParseRsaPublicKeyFromPem parse rsa public key from pem. 
  func ParseRsaPublicKeyFromPem(pubPEM []byte) (\*rsa.PublicKey, error) { 
    block, \_ := pem.Decode(pubPEM) 
    if block == nil { 
      return nil, errors.New("failed to parse PEM block containing the key") 
    }
  	pub, err := x509.ParsePKIXPublicKey(block.Bytes)
  	if err != nil {
  		return nil, err
  	}
  	switch pub := pub.(type) {
  	case *rsa.PublicKey:
  		return pub, nil
  	default:
  	}
  	return nil, errors.New("key type is not rsa")
  }

  // EncryptOAEP rsa encrypt oaep. 
  func EncryptOAEP(pubKey \*rsa.PublicKey, message []byte) (ciphertext []byte, err error) 
  { 
    random := rand.Reader 
    ciphertext, err = rsa.EncryptOAEP(sha256.New(), random, pubKey, message, nil) 
    if err != nil {
      return nil, err
    }
    return
  }
  ```
</CodeGroup>

## ⚠️ Generate Entity Secret Ciphertext

### ⚠️ ADD CODE SNIPPET HERE

### Register the Entity Secret

You can register your Entity Secret in two ways: using the SDK, or using the
Circle Console. The registration links your Entity Secret with your developer
account, ensuring that you can confidently manage wallet creation and
transactions with the assurance of robust security measures in place.

<Warning>
  As you proceed with the registration of your Entity Secret, pay close attention to the recovery file that will be generated. This file is a critical safety measure for your operations. In the event that your Entity Secret is ever lost, the recovery file will act as your fallback, enabling you to regain access to your developer-controlled wallets. Ensure that you store this file securely and in a location that you can access readily if needed.

  **Note:** If you use the SDK to register the Entity Secret, the function
  downloads a recovery file named *recovery*file\*\<timestamp>.dat\*. Additionally,
  the function returns the content of the recovery file as a JSON response.
</Warning>

### Registering your Entity Secret using the SDK

You can use the sample code below as a guide to register your Entity Secret
Ciphertext using the SDK.

<CodeGroup title="Register your Entity Secret">
  ```javascript NodeJS SDK theme={null}
  import { registerEntitySecretCiphertext } from "@circle-fin/developer-controlled-wallets";

  const response = await registerEntitySecretCiphertext({
    apiKey: "<api-key>",
    entitySecret: "<new-entity-secret>",
  });
  console.log(response.data?.recoveryFile);
  ```

  ```python Python SDK theme={null}
  from circle.web3 import utils

  result = utils.register_entity_secret_ciphertext(api_key='your_api_key', entity_secret='new_entity_secret')
  print(result)
  ```
</CodeGroup>

### Registering Your Entity Secret Ciphertext in Developer Services Console

<Note>
  If you want to register the Entity Secret within our Developer Services
  Console, you need to safeguard your Entity Secret first by converting it to
  Ciphertext following the previous instructions.
</Note>

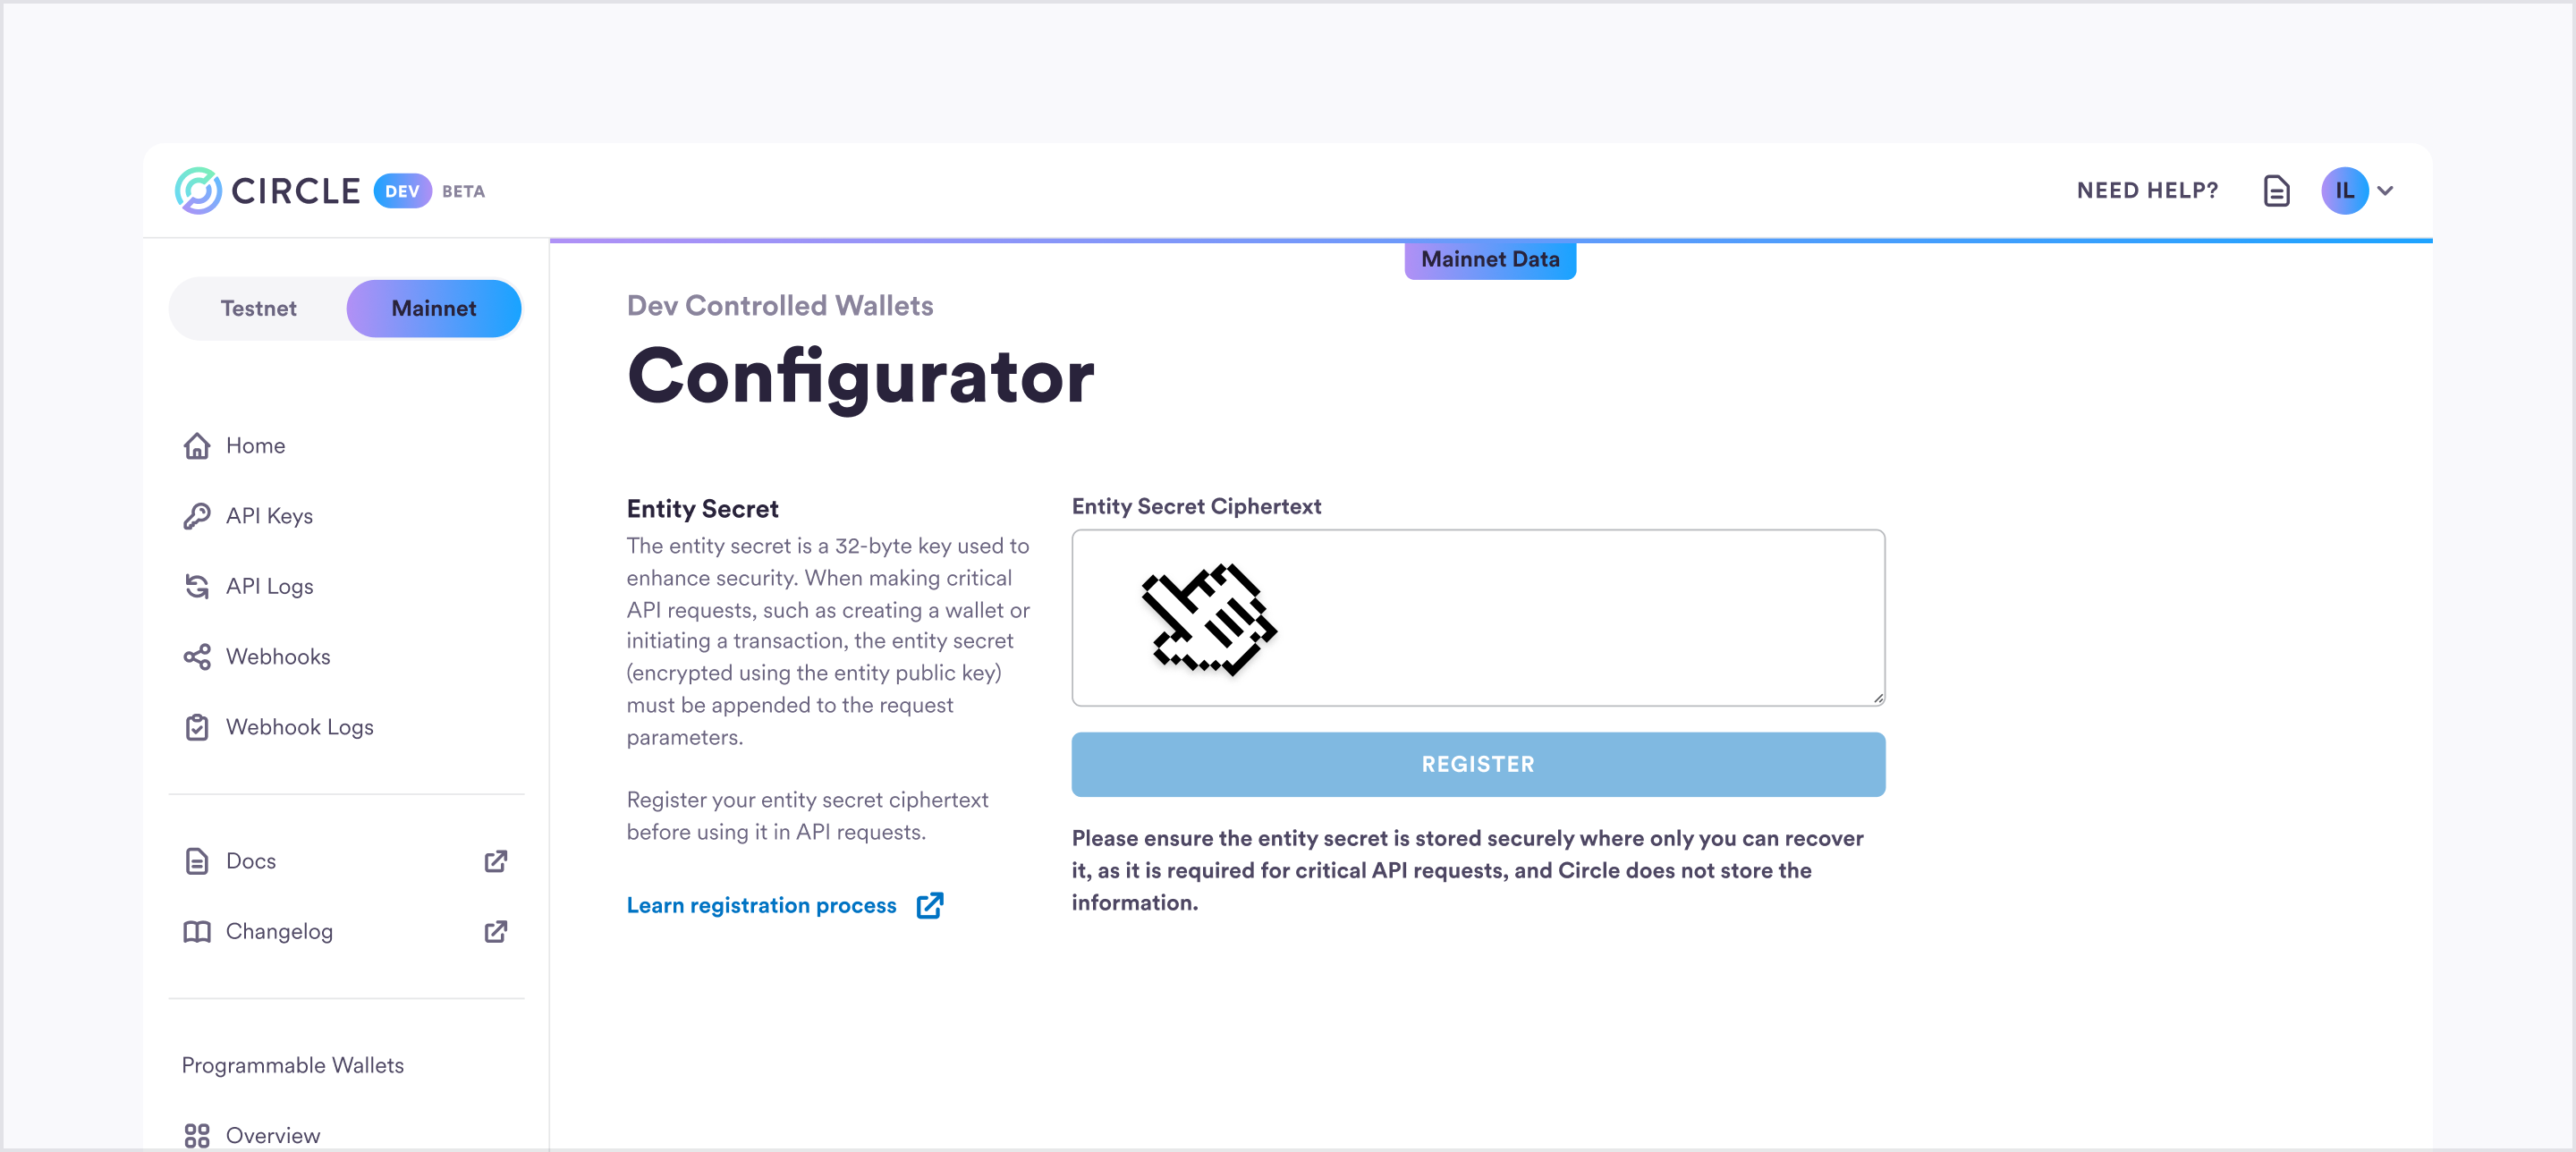
You can use the
[Configurator Page](https://console.circle.com/wallets/dev/configurator) in
Developer Services Console to register your Entity Secret Ciphertext.

<Frame>
  <img src="https://mintcdn.com/circle-devdocs-test-ai-codegen-component/zjwlouYM7ujBrWdY/interactive-quickstarts/dev-controlled-wallets/images/cipher_text_registration.png?fit=max&auto=format&n=zjwlouYM7ujBrWdY&q=85&s=187d14fc9e16edc91f39a4c178a87ae7" alt="Testnet" width="2880" height="1288" data-path="interactive-quickstarts/dev-controlled-wallets/images/cipher_text_registration.png" />
</Frame>

<ActionCard
  title="Register your Entity Secret Ciphertext"
  actions={[
{
  label: "Register",
  path: "/wallets/dev/configurator",
  type: "console",
},
]}
/>

<Card title="Register your Entity Secret Ciphertext" href="/wallets/dev/configurator" arrow="true" cta="Register" />

### Guarding your secrets & building trust

By meticulously completing the registration and protection of your Entity
Secret, you've not only guaranteed the security of your key but also laid down a
bedrock of trust for all activities involving our developer-controlled wallets.
We prioritize the safety of your data and are committed to providing a seamless
and secure user experience.

***

## Create a Wallet

Welcome to a foundational step in utilizing our Developer Services: initiating
your first API call to construct a WalletSet. We'll guide you through the
process and clarify what a WalletSet entails within our platform.

### Defining a WalletSet

A WalletSet within our ecosystem is a sophisticated grouping of wallets,
securely tied together by a singular cryptographic key. Leveraging the
Hierarchical Deterministic (HD) wallet technology, WalletSets offer an enhanced
way to handle wallet management that spans multiple blockchain networks. This is
particularly relevant for Ethereum Virtual Machine (EVM) compatible blockchains,
where it is common for wallets on different networks to share the same address,
thanks to the underlying technology.

### Grasping the concept of idempotency

As we approach the creation of your inaugural WalletSet, it's important to
comprehend a critical aspect of our APIs: idempotency keys.

Idempotency is a fundamental concept which guarantees that an operation is
repeatable without changing the outcome. This concept is extremely important in
API requests to make sure that if a request is accidentally sent more than once,
it doesn't result in duplicate operations.

Consider situations like an unstable internet connection leading to multiple
unintentional request submissions, or a user who accidentally activates a
command several times. Without idempotency, such events might cause numerous
unwanted operations.

To prevent this, an idempotency key is used. Each request includes a distinct
key that, when recognized by the server within a certain timeframe as a repeat
submission, prevents the repeated processing of that request. This mechanism is
crucial to preserving the integrity of your operations, ensuring that only
intended actions are carried out.

### Crafting Your WalletSet

Now that we've got the concept of idempotency covered, let's look at creating
your WalletSet.

<table>
  <thead>
    <tr>
      <th>Term</th>
      <th>Definition</th>
    </tr>
  </thead>

  <tbody>
    <tr>
      <td><strong>idempotencyKey</strong></td>
      <td>Think of this as a safety net. By using a unique UUID for every transaction request, you ensure no transaction is mistakenly processed more than once.</td>
    </tr>

    <tr>
      <td><strong>entitySecretCiphertext</strong></td>
      <td>Remember the encryption we discussed earlier? You'll need to provide this encrypted string for security and authorization.</td>
    </tr>

    <tr>
      <td><strong>name</strong></td>
      <td>The name for your new WalletSet.</td>
    </tr>
  </tbody>
</table>

Let's create our first wallet set!

## ⚠️ Create a WalletSet

### ⚠️ ADD CODE SNIPPET HERE

<Note>
  Ensure that your idempotency key is unique for every distinct request. Our
  APIs require the idempotency key to be of type uuidv4. Remember, its primary
  role is to ensure that the same request isn't processed more than once.
</Note>

### Utilizing API Logs for Enhanced Monitoring

For a comprehensive overview of each transaction you execute with Circle's Web3
APIs, the Developer Services Console provides detailed access to API logs. By
examining these logs, you gain valuable visibility into how your application
interacts with Circle APIs, which can be pivotal for various aspects including
troubleshooting, performance optimization, and security oversight by
highlighting any abnormal activities. For detailed records of your API
interactions, please refer to the
[API Logs section](https://console.circle.com/logs).

Within the scope of our Quickstart guide, the API log is indispensable for
gaining insights into specific API calls and the objects that are created as a
result. Think of the API log as a detailed record that allows you to retrieve
the unique IDs of objects that have been generated, especially when these IDs
are needed for subsequent API interactions. API logs are a crucial educational
resource that simplify the debugging process and help you methodically
comprehend the intricacies of the API's operations. Hence, the API log is not
only instrumental in improving operational workflows but also serves as a
valuable asset for your development projects.

Ah, the most exhilarating phase: shaping your very first developer-controlled
wallet in the vastness of web3. With your prepped API key and Entity Secret
Ciphertext, we're only a few steps away from crafting a masterpiece. Let's dive
right in!

### Understanding the Developer-Controlled Wallet

In web3, a wallet isn't just a storage mechanism for digital tokens or NFTs, but
the very essence of user interactions on the blockchain. Essentially, it's a
blend of a unique address and accompanying metadata stored on the blockchain.

For developer-controlled wallets:

<FeatureGrid cols={2} backgroundColor="transparent">
  <FeatureItem title="Address" icon="book-open">
    A unique identifier on a blockchain. Notably, while an address remains
    distinct, multiple wallets can have the same address across different EVM
    blockchains.
  </FeatureItem>

  <FeatureItem title="Custody Type" icon="key">
    This signifies who controls the private key invocation — either the user
    or the developer. For our purpose, we're focusing on developer-controlled
    wallets, which are inherently more manageable and tailored for specific
    app requirements.
  </FeatureItem>
</FeatureGrid>

With that foundational knowledge, let's get to the hands-on part.

### Crafting your wallet

To create a wallet you use the following parameters:

<table>
  <thead>
    <tr>
      <th>Term</th>
      <th>Definition</th>
    </tr>
  </thead>

  <tbody>
    <tr>
      <td><strong>idempotencyKey</strong></td>
      <td>Ensures that a request is executed only once, even if it's received multiple times.</td>
    </tr>

    <tr>
      <td><strong>entitySecretCiphertext</strong></td>
      <td>The encrypted form of your Entity Secret, ensuring robust security for your API requests.</td>
    </tr>

    <tr>
      <td><strong>walletSetId</strong></td>
      <td>The ID of the wallet set that you created in the preceding step.</td>
    </tr>

    <tr>
      <td><strong>blockchains</strong></td>
      <td>Specifies the blockchains on which the wallet should be manifested.</td>
    </tr>

    <tr>
      <td><strong>count</strong></td>
      <td>The number of wallets you aim to create. **Note:** The parameter should not exceed 20.</td>
    </tr>

    <tr>
      <td><strong>accountType</strong></td>
      <td>The type of account you want to create. For this guide, you will use SCA, which represents developer-controlled wallets.</td>
    </tr>
  </tbody>
</table>

<Note>
  To ensure the best possible experience, the quickstart will automatically
  create and fund two wallets with testnet tokens. Each wallet will be funded
  with **10 USDC**, allowing you to dive right into the Quickstart without
  delay. Rest assured, this amount will be sufficient for you to initiate your
  first transaction.

  The funding process will only be completed if you use the **Try it out**
  panel. If you are following the quickstart using code snippets, you will need
  to first create your wallets, then fund them manually using the
  [testnet faucet](https://faucet.circle.com/).
</Note>

## ⚠️ Create your first wallets

### ⚠️ ADD CODE SNIPPET HERE

<Note>
  **Note:** Smart Contract Account wallets are not availabe for Solana Devnet. A
  similar workflow can be accomplished on Solana Devnet with EOA wallets and the
  Circle Gas Station.
</Note>

And there you have it! By the end of this step, you'll have fully functional
developer-controlled wallets, ready to shape web3 experiences.

***

## Initiate a Transaction

Now that you have a wallet that contains some Testnet tokens, let's dive into
initiating your first transaction. It's simpler than you might think, especially
with our streamlined approach.

<Note>
  **Cross-Blockchain Transfers:** Tokens are native to specific blockchains,
  meaning they can't be sent directly across different chains. For instance,
  Ethereum tokens stay on the Ethereum network unless other mechanisms, like
  bridges, are used.
</Note>

### Getting the tokenId

Before we can proceed, we need to determine the `tokenId`. You can do this by
retrieving the token balances for your wallet.

## ⚠️ Get your wallet balance

### ⚠️ ADD CODE SNIPPET HERE

### **Key Transaction Parameters:**

<table>
  <thead>
    <tr>
      <th>Term</th>
      <th>Definition</th>
    </tr>
  </thead>

  <tbody>
    <tr>
      <td><strong>idempotencyKey</strong></td>
      <td>A unique string that ensures your transaction isn 't processed more than once even if sent multiple times. A critical measure to prevent duplicates.</td>
    </tr>

    <tr>
      <td><strong>amounts</strong></td>
      <td>Specify the amount of tokens you're transferring.</td>
    </tr>

    <tr>
      <td><strong>destinationAddress</strong></td>
      <td>The wallet address where you're sending the tokens.</td>
    </tr>

    <tr>
      <td><strong>entitySecretCiphertext</strong></td>
      <td>A crucial security layer, this encrypted string ensures only authorized transactions go through.</td>
    </tr>

    <tr>
      <td><strong>tokenId</strong></td>
      <td>This is the id we just extract from your wallet balance. It is the unique identifier for the specific token type you're moving. This id is unique.</td>
    </tr>

    <tr>
      <td><strong>walletId</strong></td>
      <td>Indicates the source of the transaction, i.e., from which wallet you're sending the tokens.</td>
    </tr>
  </tbody>
</table>

The preceding parameters are just the essentials for initiating a transaction.
The endpoint offers a richer, more detailed configuration to cater to a variety
of transaction types. For a comprehensive list of the supported parameters, see
the
[official documentation](/api-reference/wallets/developer-controlled-wallets/create-developer-transaction-transfer).

## ⚠️ Initiate your transaction

### ⚠️ ADD CODE SNIPPET HERE

<Note>
  Blockchain transactions pose a challenge with gas fees. Gas fees are charges
  in blockchain networks, typically paid with native assets like Ether (ETH) on
  Ethereum. This complicates the user experience as it requires users to hold
  these assets. However, with **Developer-Controlled smart contract wallets**,
  you can sponsor gas fees, removing the need to possess native assets. The
  **Gas Station** acts as an intermediary, allowing you to cover fees for your
  users, improving their transaction experience. In testnet, the Gas Station is
  already setup for you, ready for testing. In the Production phase, you gain
  more control with spending limits and configuration options. Learn more
  [here](/wallets/gas-station).
</Note>

Once you've validated your transaction and everything checks out, you're all
set. Transactions on the blockchain are immutable, meaning once they're
validated, they cannot be reversed or altered. So, always double-check before
sending!

After initiating a transaction through our API, you can look up the transaction
hash on the
[Dev Controlled Wallets Transactions](https://console.circle.com/wallets/dev/transactions)
page for in the Developer Services Console. The transaction hash is a unique
identifier for your transaction.

You can validate transactions in multiple ways:

<Tabs>
  <Tab title="Developer Services Console">
    This is the preferred method. It enables you to inspect the transaction state directly.

    <Steps>
      <Step title="Log in to the Console">
        Make sure you're logged in to our Developer Services Console.
      </Step>

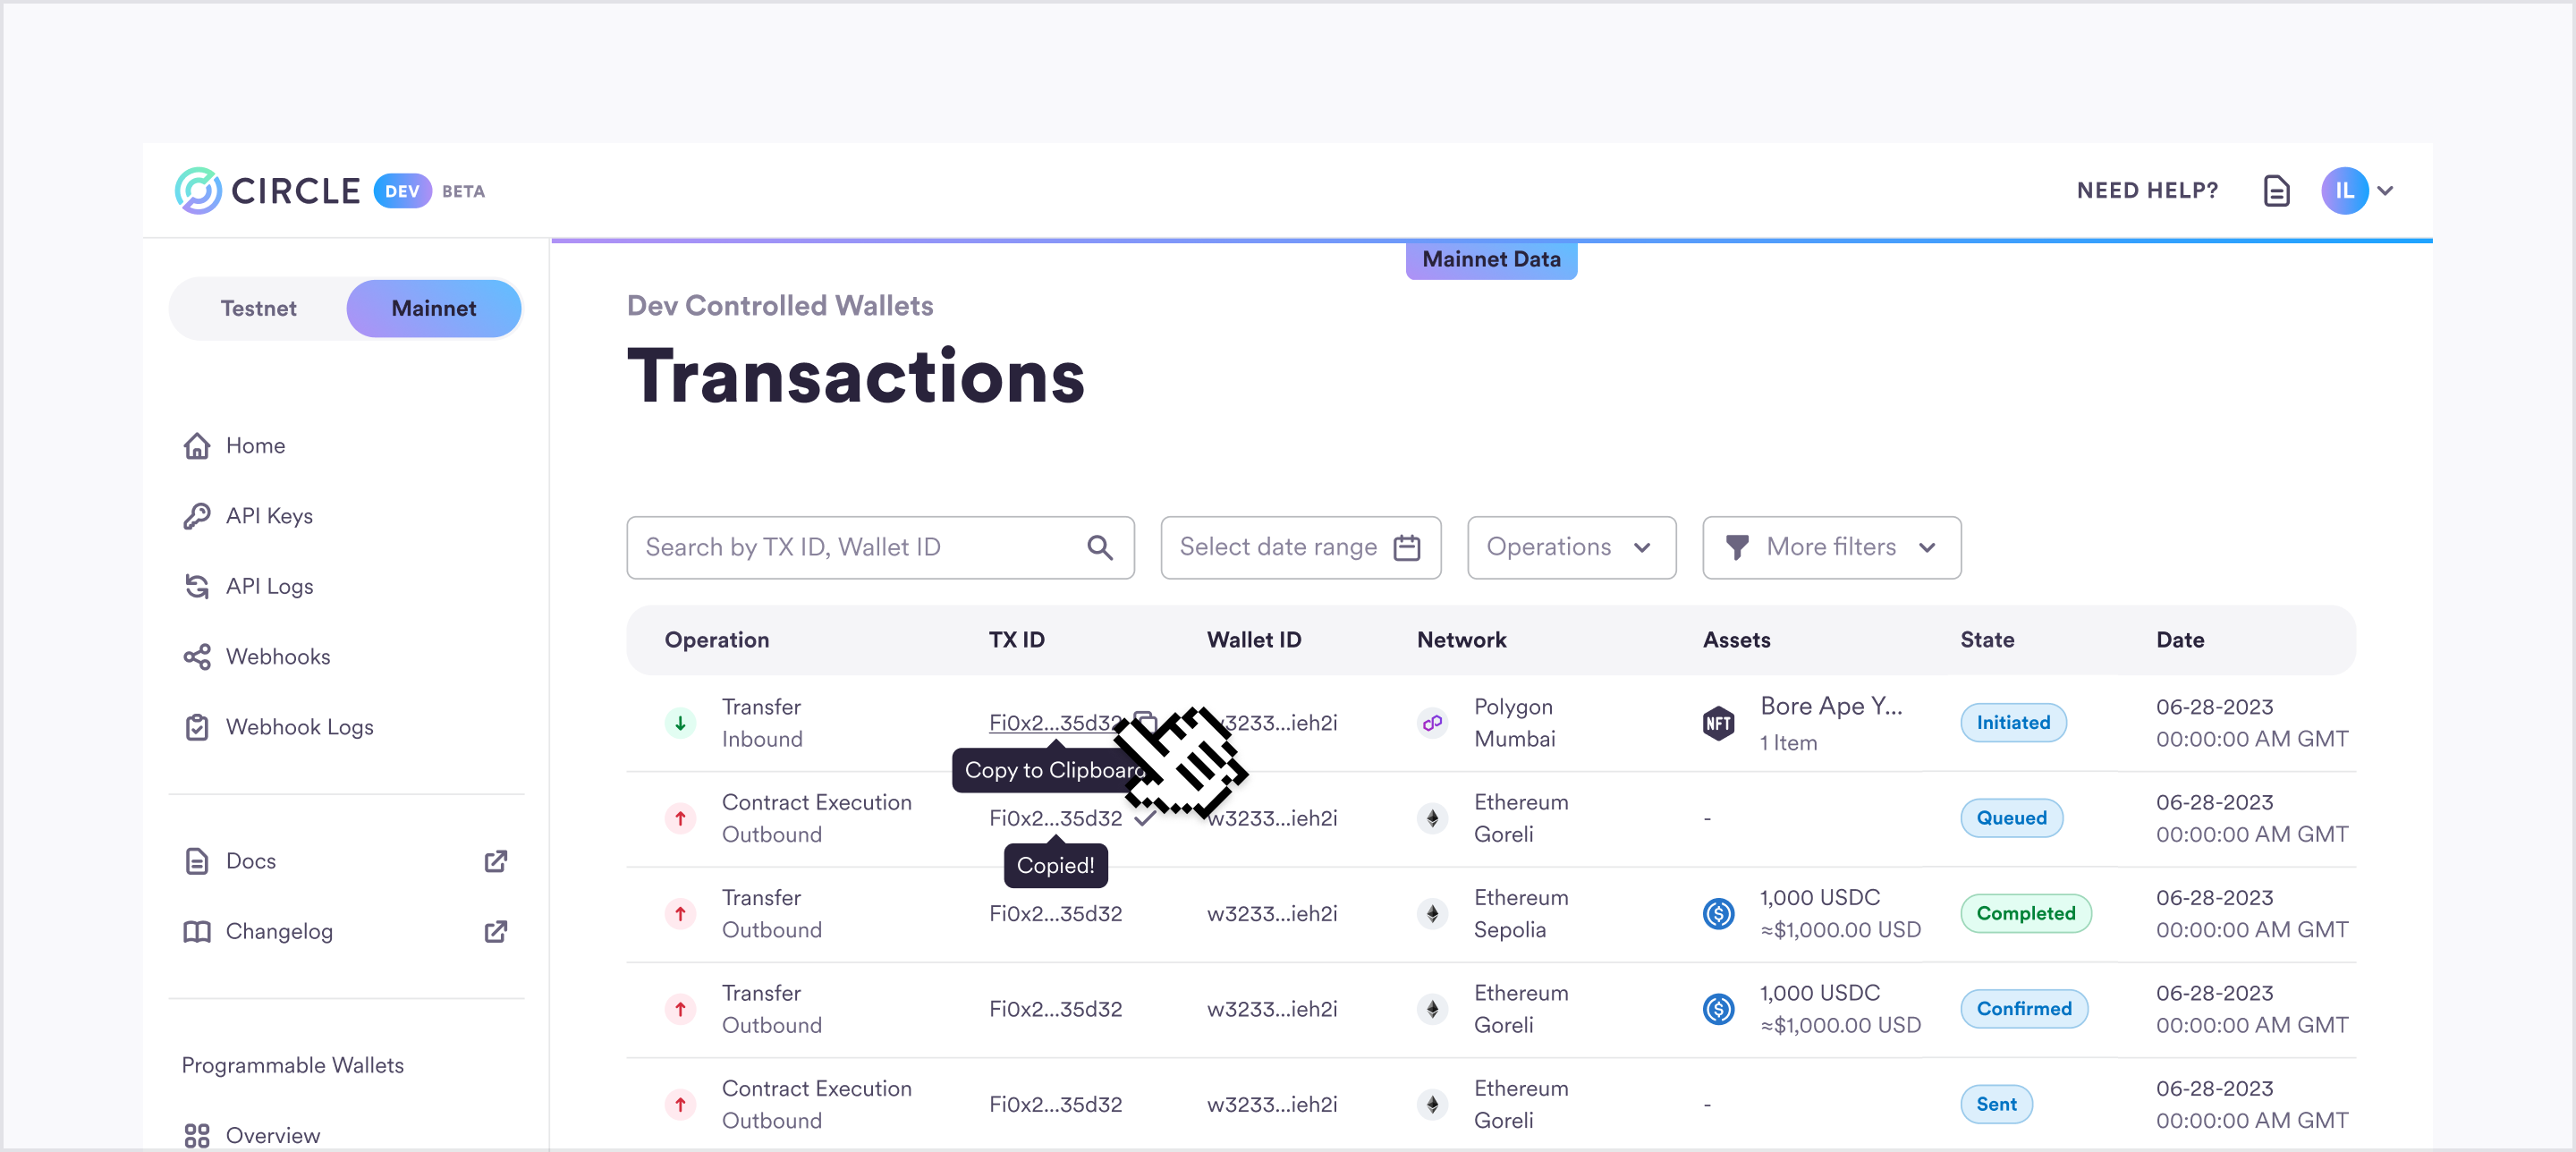
      <Step title="Open the transactions page">
        Open the [Dev Controlled Wallets Transactions](/wallets/dev/transactions) page.

        You can see the state of your transaction directly in the table.

        <Frame>
          <img src="https://mintcdn.com/circle-devdocs-test-ai-codegen-component/zjwlouYM7ujBrWdY/interactive-quickstarts/dev-controlled-wallets/images/transactions.png?fit=max&auto=format&n=zjwlouYM7ujBrWdY&q=85&s=703b7599d65eaa99845e01520957a4e2" alt="List of transactions" width="2880" height="1288" data-path="interactive-quickstarts/dev-controlled-wallets/images/transactions.png" />
        </Frame>
      </Step>

      <Step title="Open Transaction Details">
        For more details about your transaction, click on the relevant line in the transaction details.
      </Step>
    </Steps>
  </Tab>

  <Tab title="Blockchain Explorer">
    By using the transaction hash or wallet id, you can view the transaction state on a blockchain explorer.

    <Steps>
      <Step title="Choose a Blockchain Explorer">
        Depending on the blockchain your token resides on, select a suitable explorer:

        * Ethereum: [Etherscan](https://sepolia.etherscan.io/)
        * Polygon: [Polygonscan](https://amoy.polygonscan.com/)
        * Avalanche: [Snowtrace](https://testnet.snowtrace.io/)
      </Step>

      <Step title="Input your Transaction Hash or Wallet Id">
        On the explorer's main page, there's a search bar. Paste your transaction hash or wallet id
        there and search. You can find the transactionHash or the wallet id in your [list of transactions](/wallets/dev/transactions).
      </Step>

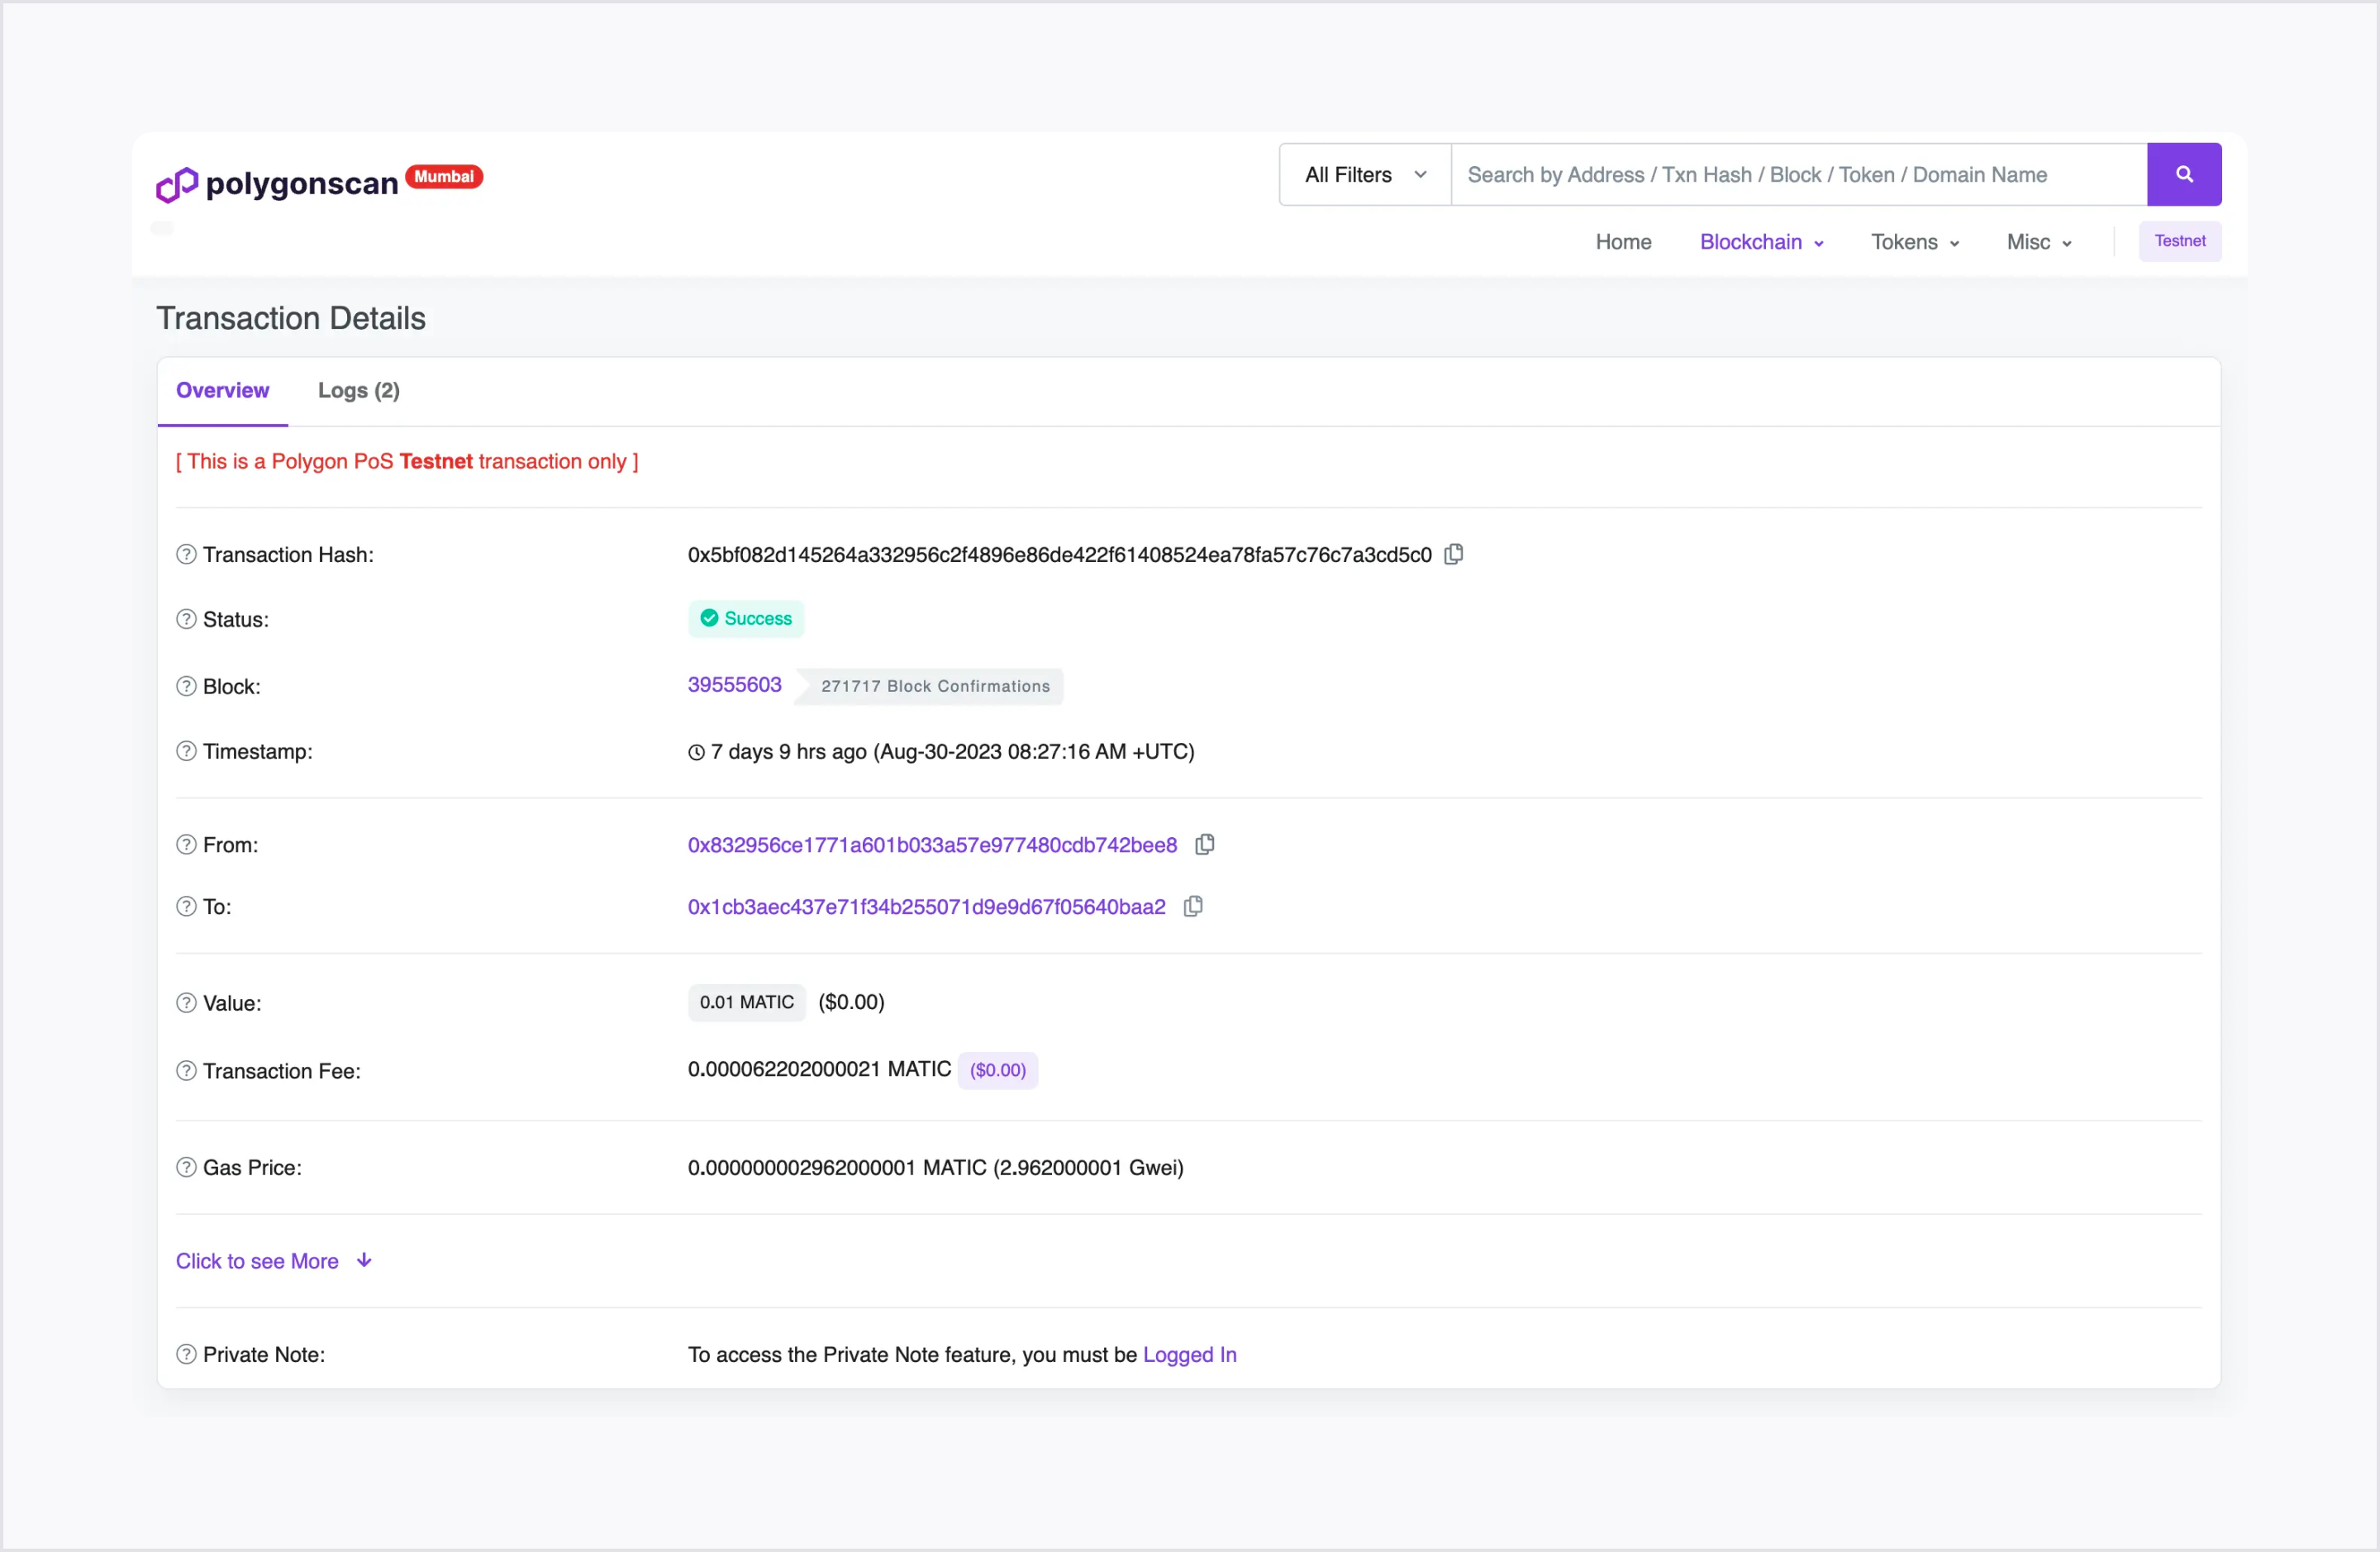
      <Step title="Review Details">
        Whether you provide a wallet ID or transaction hash, details regarding your wallet and the associated transactions will be visible. This includes particularities of each transaction such as the number of confirmations and the gas used, letting you verify that all aligns with your expectations.

        <Frame>
          <img src="https://mintcdn.com/circle-devdocs-test-ai-codegen-component/zjwlouYM7ujBrWdY/interactive-quickstarts/dev-controlled-wallets/images/explorer.png?fit=max&auto=format&n=zjwlouYM7ujBrWdY&q=85&s=ce5ceabbdfebdf05a4ca666da124da0b" alt="Blockchain explorer" width="2880" height="1878" data-path="interactive-quickstarts/dev-controlled-wallets/images/explorer.png" />
        </Frame>
      </Step>
    </Steps>
  </Tab>
</Tabs>

## Congratulations on your Progress!

Throughout this process, you've successfully:

<FeatureGrid cols={1} backgroundColor="transparent">
  <FeatureItem title="Established your Entity Secret" icon="check">
    You took the initiative to generate and secure your unique Entity Secret,
    ensuring that your interactions remain encrypted and safe.
  </FeatureItem>

  <FeatureItem title="Created your first Developer Controlled Wallet" icon="check">
    By setting up your wallet, you now possess a powerful tool that allows you
    to engage with web3 networks with full autonomy.
  </FeatureItem>

  <FeatureItem title="Got Testnet tokens via faucets" icon="check">
    You've effectively tapped into the Faucets, filling your wallets with
    Testnet tokens, a crucial step for practical, risk-free experimentation on
    Testnet.
  </FeatureItem>

  <FeatureItem title="Initiated a blockchain transaction & validated it" icon="check">
    Not only did you initiate a blockchain transaction, but you also took the
    proactive step of validating it using blockchain explorers, assuring
    transparency and trust in every move.
  </FeatureItem>
</FeatureGrid>

### Stay connected & Explore more

Your journey with us doesn't stop here. There's so much more to discover und
dive into:

<FeatureGrid cols={1} backgroundColor="transparent">
  <FeatureItem title="Dive into our documentation" icon="book-open" href="/">
    Your comprehensive resource for understanding our web3 tools,
    technologies, and best practices.
  </FeatureItem>

  <FeatureItem title="Join our Discord server" icon="message" href="https://discord.com/invite/buildoncircle">
    Engage, ask, share, and collaborate. Become an integral part of our
    vibrant developer community.
  </FeatureItem>

  <FeatureItem title="Sample Apps" icon="code" href="https://github.com/orgs/circlefin/repositories">
    Get hands-on with real-world use cases, or gain inspiration for your next
    big project.
  </FeatureItem>

  <FeatureItem title="Start building with our SDKs" icon="lightbulb-on" href="/w3s/web3-services-sdks">
    Explore our server and client-side SDKs to start building.
  </FeatureItem>
</FeatureGrid>

**Engage, Build, Share!** Dive into our forums, share your feedback, and keep an
eye out for exciting challenges and hackathons. Your unique perspective and
skills are valuable, and we're eager to see the innovations you'll introduce to
our growing ecosystem.

### Your feedback matters

Before you embark further on your journey, we'd love to hear from you. Your
feedback shapes the future of our platform and helps us provide a better
experience for all developers.

What did you love about the process? Was there something you wish was different?
Every insight, no matter how small, matters to us.

<FeedbackButton />

Thank you for your trust, dedication, and enthusiasm. Here's to the next chapter
in your web3 journey and the marvelous innovations you'll bring forth.

**Happy Building!** 🚀

**Next: Explore more Quickstarts**

<Columns cols={2}>
  <Card title="Developer-Controlled Wallet" icon="code" href="/interactive-quickstarts/dev-controlled-wallets" arrow="true" cta="Start Tutorial">
    Will show you how to set up custodial wallets by establishing your entity secret and how to initiate a transaction.
  </Card>

  <Card title="User-Controlled Wallet" icon="code" href="/interactive-quickstarts/user-controlled-wallets" arrow="true" cta="Start Tutorial">
    Learn how to set up non-custodial wallets for your end-users and initiate a transfer for them.
  </Card>
</Columns>
